Tuesday 31 July 2012

Generation 9 Tips (Part Three) - The War and the Time After

Now that you've gotten the bulk of the war out of the way and have stopped the (not so prevalent now) elf / giant conflict with a hand drawn picture in the previous part, it's time for the last push against the shadow bastards and put an end to their plans.

Scouting Mission (best bring party)
This mission features the return of Glas through random encounter, but this time he doesn't summon gargoyles - he summons crag cows. The alchemist method of beating him is to wind blast a cow 3 times so it gets confused and attacks Glas. The non stupid method of beating him pretty much just revolves around using trans and then Final Hit the fool. If you prefer you can lure him out with ranged attacks first. Crash shot will also hurt him badly when he's surrounded by the cows.  He still regenerates quick and will have a ton more HP this time around so you want high damage or wounding strikes.

 After he's done a named alchemist will show up and while he can also summon golems and invert your screen, if you've just beaten the big four armed monster there's not a lot this idiot can do to you.

Damsel in Distress (fastest solo)
Your first mission where you can bring a Royal Alchemist if you so choose (and if you know any that are free), but I think you should be able to handle this solo. The mission says to protect Jenna. This is BS. She can protect herself just fine against melee-ers. You keep -yourself- alive and kill any archers as soon as they show up. If you've cleared your sector -then- you can go help Jenna until the next wave arrives.

Alone in the Barri (solo based on level)
Whew, suddenly you get a normal dungeon. Makes you suddenly appreciate those goddess statues huh? Anyway this place will be geared to your level and if you are on a difficulty of advanced or below you would have already encountered everything in here in prior Generation quests. If you are on Hard, then there are a few new things but then again if you are on Hard you've prolly already fought them? :P In case you haven't,  they all multi-aggro and are:

Chon Chon
An ugly magic-using bird. Treat as a strong sprite. Weak to magic. Resistant to melee and range so big hits only if you're going that way.

Goblin Hunter/Archer
Sturdier goblins that can poison you. No passive defenses mean you can kill them however you like, though a high ranked windmill or final hit is probably the fastest way to take them out.

Spiked worm
Dangerous and highly resilient to all forms of attack. Treat as a heavily armored snake. The wiki advises fire bolt-counter. Being a non-mage I either bow them or smash-windmill.

Lost Sahagin
Are quite blind and have a small aggro range. However if you hurt him to less than half HP, he triggers his self-destruct - giving you mere moments to run away. Killing him outright also makes him explode so they are best dealt with using range or magic. The blast is strong enough to kill or seriously injure anything nearby (1/3rd dungeon room) and if there are many of them this could lead to a chain reaction.

Last Battle (full team recommended)
The allied army has now decided to attack the shadow realm in force! Your task is to make sure not a single one of them dies in the 15 minute blood bath about to follow. Strongly recommend a full team to handle the many waves of enemies that show up, as it is unlikely that you will be able to heal your compatriots between waves. Target the enemy golems first as their windmill can do a lot of damage in a wide area and try stagger your trans-times between your party so that 1 or 2 of you are beefed up at any given point. Always try pick up downed players when you are able to though.

Finale (full team recommended)
Usually the same team that helped with the Last Battle will want the XPs from this one so bring them in with you. Now that you don't have dorky NPCs to protect the fights should be a lot easier, and even the named shadow commander will suddenly be curb-stomped since there are more of you. Fight your way into town past numerous cutscenes and eventually you get to the big boss of this story arc.

Boss Fight!

OMG it's Deadpool!
Well, half of a giant version of him. He has life drain, a big stomp attack, a fast moving rush, and later giant flying swords all of which can easily kill those in range. He's got pretty high protection too so the best attacks are either from far with a high crit bow, or upclose using smash and windmill. He gets angrier at half HP, and at 1/3rd (the roof is opened) someone -has- to call Adniel for help or everything will do 1 point of damage. As usual, mana shield and many pots can keep you alive during this battle. I shouldn't need to remind you to use your trans by now. Winning gives you a groovy title, and a less groovy enchant for your shoes. :p

Pierrick's Violet Grave
A small side quest that you can do. Only dangerous part is wandering into Fiodh solo. You would have already fought everything here in previous generations though and have definitely defeated worse monsters so it should be a cake walk. A long cake walk.

Reminiscing with Andras
Another small side quest that opens after finishing the main Generation 9 arc. Two potential problem spots here, the first being Longa Emerald dungeon which (unless you are an elf) you may not have run yet before. Baddies spawn in big quantities here but they are individually weak. Things you'll encounter are:

Stone Masks - Treat like goblins that have magic.
Armored Hounds - Good old Wolf AI. They sound like a dude going "UHHH" when you knock them down though.
Pythons - Maybe big, but still just snakes.
Beetles - Similar to the Giant Dragonfly earlier. These Low HP flying bugs come in droves and some can windmill, so windmill THEM first!
Emerald Golem - Your main problem. This boss will only take big damage from Emerald Arrows that you get from running Longa normal. Still defeatable if you and your team just wail on him enough but expect to take a few hits because he won't go down so easy without a properly armed archer.

The 2nd problem spot which is an RP quest as Andras through a FULL Rabbie dungeon. She excels at magic so you may want to stick to that like you did with Tarlach during his run.

The Ending Question
If you say that today is important you'll get the Tailltean Two-hander. If you say that the past is more important you'll get Andras' Bow. Both are decent weapons so it just depends on what you want.

Monday 30 July 2012

Generation 9 Tips (Part Two) - For SCIENCE!

After setting the stage in part one, the bad guys are on the offensive and you'll be spending loads of time in the shadow realm to hold them back. "Fomor Counterattack!" makes you run regular shadow missions to display this and they are all quickest to be finished on BASIC. Later on you will not be given a choice on difficulty. :P

Defeat a Bovine (fastest with friend)
Your first important scouting mission is to wander around and get stoned again, just like the previous mission. Only this time you can bring a friend and instead of looking for a dude with wings you are looking for an ugly cow. I guess the enemy eats these cows so, eliminating one will make them starve or something? Who knows. New baddies anyway are:

Shadow Shire
Evil horsey! They smash hard and will multi-aggro with whoever they are with (never alone). Probably on the same "to-kill" tier as shadow lancers. Being horses they gallop around pretty quick and will generally be the ones to catch you mid-skill if you aren't careful.

Crag Cow
You've fought these already as Leymore but perhaps this single cow is your first as your actual character. Treat it as a gorgon with -heavier- stander with more HP and does more damage. Smash, windmill, and counter your way to victory.

Defeat the Shadow Warrior (solo)
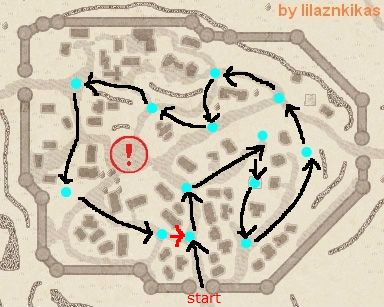
Seems the city is being held by a single fomor bastard with a few minions. This is a simple run through the shadow city against mostly single aggro spawns. Once you clear all the orbs you get to fight Lo Wang... erm I mean, a Shadow Warrior who is essentially a beefed up shadow fighter. Get used to them as they will come out as regular baddies soon. Also, it will pay to develop a route to follow to hit all the orbs on the map as you will be doing this a LOT - sometimes even twice in one mission.

That's the way I do it. Props to lilaznkikas for base map.


Taillteann Defensive Battle (3-6 people, 6 ideal so everyone has someone to chat to)
Now that you've taken the city you need to defend the gates against enemy forces as they march in. Well that's a lie, more like you need to defend the gate guard NPCs as enemies "beam in" from the mothership. Each pair of NPCs have no chance in surviving the onslaught so it will be up to you to kill them quickly. Windmill and pets are highly recommended. Be sure to also heal the guards if you get the chance between waves as they need to survive around 20 minutes. The giant guards are particularly moronic in this mission. Should a pair of NPCs fall, follow the road back towards the center where the spawning will continue. If too many pairs die, game over - restart. High level dudes running this on basic can pretty much hold a gate solo, but it's just... boring.

Battle for Taillteann I (fastest with 4 people)
After your efforts in the previous mission the town has fallen and is now overrun with enemy forces. Good work. :P These scum are slightly better armored than previously and have more HP. They're also fortified behind barrier spikes and ice mines. To clear the entry quick you can get a buddy to call Adniel and dragon strike the first group out of the way. Alternatively rush the right most side where there's a gap between the wall and barrier. If you are mounted when you hit an ice mine, you can dismount and unsummon your steed to negate the effects. You can also use an L-rod to spot them and disable them with range or magic. Their archers can shoot over the barrier spikes so flank-charging is a good idea. There are no orbs here, so just circle the roads around the town square to find any opposition. Once you get in, you will meet a new baddie:

Shadow Commander
Gold armored dude is the "final" upgrade of a shadow fighter and he comes with instinctive reaction (don't open with a smash if he is idle), an ability to summon numerous snow golems (usually when near death), and a very fatal life drain which targets everyone in a set radius. He glows red and is technically invulnerable when this happens so unsummon any pets giving him more HP and back off yourself - you'll only be able to walk but if you have evasion you can use that to cover more ground faster. Final Hit is a good way to stop him doing anything if you've got it, otherwise strong windmill, normal attack or magnum range will suffice.

Defeat the Shadow Wizard (fastest with 8 people)
Since you beat the last mission the fomors have moved a friggin army in this time - as you will see in possibly your first orb run marathon, you'll need to clear the circuit twice and be facing pretty much everything you've already fought but in bigger numbers and in mixed spawn, so plenty of multi-aggro here. Second circuit provides slightly stronger enemy combos so the easiest way to go about this is just bring a big team to trash them quick. You -can- do this solo but it takes some time and skill. At the end you'll face a shadow Wizard Dude who is almost exactly like the shadow wizard chicks, except stronger. He can teleport around too, often jumping behind his intended victim. You can catch his teleport easily with a windmill so other than that, just treat him like one of the girls.

Conflict! An unexpected Battle (bring four people)
The fomors decided to setup a field camp outside the city (which I guess is the unexpected part in the title) and you are to assist an allied squad to wipe them out. Only problem is the enemy is fortified behind barrier spikes and ice mines (which you'll have no time to detect/disarm), they are elite troops, and should even ONE of your allies die (happens easily) you fail. Transform before entering as this is a very short but difficult mission and have two guys flank the barriers to take those archers out ASAP while the others protect the allied soldiers out front. It is possible to flank and call dragon air-support to eliminate the back rank quickly but you have to target the zone carefully - friendly fire will often result in mission fail.

Gay Times at Coill (as Elatha)
After all that fighting you are rewarded with some incubus on incubus action! Elatha fights better with magic and can still do decent damage with his wand so don't bother switching to the longsword. The only thing new in Coill for you will be an incubus at the end. In general they are bad bad news, have high levels in all passive defenses and can use advanced magic, along with doing high melee damage. Use a firebolt/icebolt combo to deal with him but be ready to counter or windmill if he gets too close.

Secret Experiment Time (easiest with friends)
Now it is back to the shadow realm to collect 8 clues. No new monsters but since it is now at the "level of the party leader" they may be stronger than usual. Also, everytime you run these missions they get longer and harder so to prevent arousing the bad guys so much you should work with friends, better if these friends are also looking for the clues. Clues appear at the end of each run, 2 per chest. One set - based on the in-game time you entered, one random.These are not tradable themselves but the treasure chest keys ARE. If you have buddies that don't need the clues have them hand over their treasure keys to help complete your book more quickly.

Set clues are:
12:00 AM - 3:00 AM, clue #1.
3:00 AM - 6:00 AM, clue #2.
6:00 AM - 9:00 AM, clue #3.
9:00 AM - 12:00 PM,clue #4.
12:00 PM - 3:00 PM, clue #5.
3:00 PM - 6:00 PM, clue #6.
6:00 PM - 9:00 PM, clue #7.
9:00 PM - 12:00 AM, clue #8.

Alchemy Experimentation (best bring a friend)
There are a few evil alchemists in this mission so bringing a friend to help deal with them is a good idea. Leymore will assist for one part of the mission too, don't let him die or it's game over. At the end a named Shadow Commander will appear and he will be tougher than the last one you fought. Team windmill or enough final hit should do the trick. If you prefer range then light up a fire first so that at least your first shots will do double damage. You have a lot of room to move - the whole city in fact. Just look out for those summoned golems as they will pack a punch.

Couracle's Heart (best with three people)
Similar to a higher level clue-hunting mission, by now you should be familiar with all the spawns and how to best deal with them. Your main adversary here is time. 30 minutes isn't very long to complete your circuit so speed up the process by bringing friends to clear the orb sections quickly. Don't forget to bring some paper to draw the damn thing once you get there. :P

Sunday 29 July 2012

Generation 9 Tips (Part One) - Where the Fomors Hide

Now we begin the next major arc of the story and the introduction of alchemy! I am assuming that if you're still here that you've gone through at least some of my previous Mabinogi Classes. As usual I'm only covering the parts that may give you grief and boars and wolves should no longer be on that list! :P

Hero of Mag Tuireadh (solo as Fallon)
I think you actually fail the mission if any of your allied soldiers die (maybe not but it's good practice for later), which means you need to get moving quick and assist the dudes taking the most damage. Fallon is not bad in melee but he won't be as tough as your main character if you've done all the previous Generations so fight well and drink potions as needed. The black warrior boss behaves a lot like the Dark Lord with his teleportation antics and is the biggest threat to your buddies since he will be changing aggro a bit. Like the Dark Lord he can't do shit if he's on his ass so smash or WM that idiot and don't worry too much if you fail a few times, it's just an RP mission anyway.

Medal of Renkinjutsu! (fastest solo as Leymore)
Another RP this time as a mid level alchemist (alas not as either of the Elric brothers), and serves more as an introduction to alchemy skills if you haven't used them yourself yet. Like bolt magic you can load up to 5 units of whatever into your cylinder before firing it. Wind blast shoves things away, water kills em. Between those two plus standard counter you should be able to make short work of everything here. While this is technically the first quest that will be "scaled" based on your total level, have fun with it and try things out as you lose nothing really if you fail the mission.

Too easy if they were in it. :P

Supply Run (fastest solo)
I don't know why you have to hit a whole bunch of orbs while "delivering" stuff, but this serves as an introduction for your actual character to the denizens of the shadow realm (if you didn't just jump in here for the heck of it earlier). The last orb near the gate has around 2.5 times more spawn than the rest but you have all the room to back up to snipe and lure if they give you any issues. If you've never seen them before - here's a quick run down.

Grumbils
Basically just more colorful yet low-damage gremlins. They only spawn with other grumbils and given that you would have fought worse by now, should not be an issue.

Shadow Archer
Should be high on your priority target list as their ranged attack and magnum can do decent injury damage. They also dual aggro so you need to take em down fast. This shouldn't be a problem if you can get up to them as the only move they have at close quarters is defense. Once in melee they're pretty much screwed.

Shadow Lancer
After the archers you want to kill these guys next as they too dual aggro. They like to run around a lot like skelies though, giving you lots of time to counter or better yet, windmill.

Shadow Fighters
Dim-witted single aggro brutes that can pack a wallop. Basically treat them as goblins with large HP. They also hold defense up for a long time and tend to advance on you at the same time, giving you ample opportunity to smash their faces when they do.

Deliverance of Ice Mines (solo w/ Jenna NPC)
You'll have Jenna backing you up now and you must keep her and yourself alive as waves of shadow fighters and lancers assault from the small, nearby pathway. You have a minute or two to deploy those mines you were given which should help stem the tide. Enemy forces are bringing no ranged assistance, so feel free to annihilate the idiots how best you see fit. Don't worry too much about Jenna, she can usually handle stragglers - just make sure to stop or at least severely injure the bulk of the enemy as she can get overrun.

Rundal Temple Rumble (solo)
A small fun adventure in Rundal, where instead of skelies you get hooded cultists. While they have low passive defenses, they only single aggro, have pretty low HP, and run as slowly as human characters. The ones with shields are immune to ranged, but other than that you should be able to mop the floor with these guys.

Font Fighting - Corrupt Alchemist (solo w/ Jenna NPC)
Technically part of the NEXT generation (G10), this becomes available to you now so I'll just go through it quickly. Around 1/3rd in, Jenna will join and help you out with multi-aggro. At this point see to your own enemies first before helping her out as she can take a few hits. You can also patch her up in between fights. "New" baddies introduced are:

Bone Fighter/Lancer/Archer
Unlike your standard skeletons (which are actually more dangerous), these ones behave exactly like their "shadow" counterparts and should be treated as such. Bone coloration signifies their strength with gold (ironically) being the strongest and bronze the weakest.

Shadow Wizard Chick
Enjoys fire bolt and having nice hair-dos. Quite dangerous and should be high on your priority list of targets beside archers. Their punch does decent damage but it is preferable to their magic. They have a nasty habit of chain firebolting people to death. Smash or windmill them early to avoid this.

The Titluar Corrupt Alchemist
Fighting any alchemist sucks because you're going to be thrown around like a rag doll, set on fire (uncommon), hit by painful water balloons (often) and even frozen (corrupted ones only). They pack decent melee damage too and are again high on the list of "dudes to kill first". Fortunately they only know defense up close so get to them early and finish them quick. You'll be thankful to have Jenna with you for this run to interrupt his skills in this mission, but when you're on your own later I hope you either have a good charge, dodge or mana shield rank with multiple alchs gunning for you.

Shadow Walker (solo)
The main objective here is to find some psychadelic berries, consume them, and talk to some dude who only appears when you are high. Seriously. You'll want to hit trees to get red or purple berries, and they are often guarded by red spiders and skeleton wolves. They'll be stronger than the types you are used to, but more HP/damage does not mean smarter. If you are silly enough to rush in there and get surprised by multi-aggro then I think you've earned a butt whooping. :P

Friday 27 July 2012

Generation 8 Tips - The Unfair Dragon

After that let down of an ending in Generation 7, you'll probably want to get right into this and you will shortly be introduced to the volcanic region of Zardine. Lots of new stuff up here but I'm just going to focus first on the story-arc specific problem spots:

Par Ruins Unicorn (fastest solo)
Before trying this dungeon you should do yourself a favour and raise your taming to rank A or better. You'll be needing it in a few spots in the future, and it will save you some time later on. Par will not be as bad as your last visit here in G7 and there shouldn't be anything in here that you need help with. If you are getting beaten by wicked penguins or ice worms then you are doing something wrong. The boss room contains a single cute unicorn that you must tame. If you kill it, you will need to run the dungeon again.

Hella Longa (as Kelpie)
You will be missing the otter from G7 at this point. Kelpie has crap gear and even worse skills. Expect to spend a few hours in what is perhaps the most annoying RP quest in the game thus far. In rooms where the desert ghosts go "invisible" try sketch them to level as an alternate method to "heal". Also use up whatever AP he can scrounge to help end this nightmare sooner.

Renes Taming
This is where previous taming ranking will come in handy. You'll need to tame yourself some Anteaters and Boars in the Renes region and in case things go awry, both use "pig" AI and only know Counter and Defense (the boars have low heavy stander though). Reaching the boars at Pera can be scary but is pretty straight forward. If running, don't stop for anything and try steer clear of any black leopards, balrogs or big dragons (you'll get to fight one later :P) in the way. If flying, keep low and away from the wyverns in this region as they can and will attack you, making you crash to the ground. Mark the mana tunnels in that region to facilitate faster transport later on.

Baby Balloon (fastest solo, more fun with friends)

You'll also need to collect some "stars" from wyvern hunting and to do that you need to go ballooning. This can be a really fun exercise for a group and I suggest bringing at least one other person with you on your first trip and each carry a flint or two (fuel) with a large balloon. Once you get used to the balloon controls and how to refuel, position your craft near the outskirts of a wyvern cluster. The best way to bring down wyverns are with magnum shot, bolt magic (depending on wyvern type) or ballista (in that order) as the wyvern tries to do its fly-by breath attack. You don't need to collect all the stars in one go, but you should get them all without leaving the area or handing them in to Kelpie for a reward. Ballooning is another quick exploration exp collection method, but it depends on how much you like ballooning and how good you are at ranged combat.

Fossil Cleaning
While fossils drop from most of the critters in Zardine, the fastest way to get one is to grab a pick axe and head to the sulphur pits. Dig one up from the rocks, preferably the ones that don't look like golems! You'll get poisoned while digging in the area (and if you've smelled sulfur before then you know why) but you shouldn't be too worried about it. Once you have a fossil get out of the fumes then "use" it to start the cleaning mini-game - you just have to remove all the dirt outside the fossil picture. Artists used to using a mouse will find this really easy. Fastest way to get the result you need is to first outline the shape (how close to the line is up to you, if you are a novice stay a bit far). Afterwards, switch to the largest brush in the top right corner and get rid of anything from your outline to the border of the minigame. Just with that you've already removed like 60-80% of the dirt. With your remaining time, switch to the smallest brush and try get as close to the lines as possible, without going over them. If you are exceptionally good at it, this method will also trump the Cor circuit for exploration gain as there is no idiot named Voight who will screw up half your stuff. :P

*Dun Dun DUUUUUUUUUN!*

Bad Dragon (bring a team)
You can bring up to eight people with you to face the final boss of this arc. Try bring at least six. This bad boy is nothing like the dragon in Generation 3, and almost all his attacks will make you go deadly or die. It is recommended you go in with a high % of level exp (99% ideal) so that you can use it to respawn within his cave. At -100% you will not be able to respawn via that method anymore and will either need to wait for a feather res or use up a Nao stone (to get ressed Nao :P). You cannot attack this guy when he flies up so this is the time to get onto a fast mount and run as it is the signal that he is about to use one of two unfair orbital strikes.

Meteor swarm features big rocks falling and exploding all over the place, but his lightning storm is more dangerous and lasts longer - safer to wait for the bastard to land and let the effect wear off before rushing him again. When he is on the ground, he may use his flame breath which kills anything in a cone in front of him so circle wide around if you find yourself there. He also has a tail swipe which kills anyone in a wide arc in-front of him as well as a charging move that goes in a straight line forward. Expect to die a bit and bring plenty of feathers. You can regain EXP by sacrificing your pets to the dragon's attacks then ressing them. Also you do double damage if you manage to attack the beast's throat, but if you're doing that then you are likely standing where -all- his attacks can hit you back. Just keep at him and eventually he will die, earning you a powerful ability that you can use in the future.

You can also try the Renes Egg-Guarding game (which doesn't make much sense) but since I've not done it properly yet, I'll have to write about it some other time. ^_^

Thursday 26 July 2012

Generation 7 Tips - Can I be a mongoose?

No but you can be an otter! There is no "story" for Generation 4-6 (they were just new areas - Rano, Physis and Connous) and there is no proper "quest" that starts this generation off (its also a new area - Couracle); in-fact you can skip it, but I've always thought skipping stuff is just giving yourself less game content and is generally a stupid thing to do. Here's the quick run through of the problem parts, and as usual, you can find the rest of my classes in the binding post:

Those Effing Fragments
You'll need to get yourself to Couracle in Iria and mark the mana tunnels at Cor and the one nearest Pantay swamp (still kinda far). Remember that if you have no flying mount you can just ride the hippos across the river. Once at the swamp you'll need to use L-rods to excavate chests and bring back fragments (2x2 preferred) to Voight. You are after an ancient sun, snow and lightning fragment and if you have been doing basic exploration AP harvesting then you know how to do this, and that Voight is going to fail on around 30% of your retrieved stuff. Be prepared to spend a lot of time in the swamp hunting for these. Also you will probably run into these during your prolonged stay there:

Giant dragonfly
Like spiders, these only know defense but can multi aggro if you are silly enough to wander into them. They also have low HP making them easy kills, but they are easy enough to avoid.

Hippos
Only found on the Western part of the swamp, these ones have "pig" AI and know defense and counter. They also have heavy stander due to being fat so be careful with normal attacks if you end up fighting one. Usually they'll leave you alone anyway, just don't provoke them.

Swamp Cobra
Has your standard snake AI (with smash) but is possibly the first critter you've encountered that has poison. Poison in mabi is very bad in that it does a percentage damage based on how many HP the victim still has. It won't kill you but it will get you to 1 HP pretty quick. For this reason if you have to fight these, kill them fast and don't let them bite you!

Gator
Aggressive sharp-toothed lizards that like hiding in the swampy water. They aggro pretty quick, enjoy smashing, and do high levels of damage. Of all the swamp critters, these are the ones you will probably end up fighting most during this section. They will easily outrun you so fight well and bring bandages to recover from any injury (black) damage  they do.

Hobgoblins
Can pop out in pairs when you find chests. If they are exorcists then you can probably try take em out. Just treat them as goblins with magic, nothing really special. However if head hobgoblins appear I suggest you run. They have high levels of stander, high hp, fast multi aggro and do lots of damage making killing them before they and chestdespawn a bit of a challenge. Fortunately they only run as fast as you (human speed) so it should be easy, and probably less time consuming, to escape.

Row, Row, Row your Boat
Once you have all three you'll need to visit the temples at the bottom of Erkey falls. The only way to get there with out help is by rafting, so make your way up to the La Terra Highlands with 10 pieces of firewood and you can talk to the native up there to build your raft. Bringing sufficient pots to stay alive is also a good idea as you will be attacked by hobgoblins on your trip down river. If you have it, you can use advanced magic or high rank crash shot to blow away the opposition on the banks as you pass but otherwise just transform and make sure to steer the raft to the RIGHT at the junction or you'll have to do it again. Once you've made the turn, steer left to avoid docking (unless you want to get off at the hobgoblin village but you may lose your raft) and fall down the waterfall. The cutscenes here lag sometimes so just be patient and wait them out. Once down there it should be safe enough to do what you need to do. If the giant alligator is awake, it may be best to avoid it for now. :P

As a side note, Rafting is another way to gain exploration exp and is quicker (but obviously more dangerous) than doing the Cor circuit if you can kill lots of hobgoblins during each run.

Longa Otter - (as Ruwai)
The highlight of this story arc, Ruwai is pretty kickass for an otter. Use more of his normal attacks instead of smash as he can chain a long set of them and you should get past all the scum of this desert dungeon in no time.

Mirror Mirror (need a giant)
If you aren't a giant, you're going to need one to help you get through the Par Dungeon part of this arc. While there are "ice" or "snow" variants of things you should be familiar with, there are a few new enemies as well:

Shrieker
Floating ice heads that behave like wisps, though they favor ice bolt. Remember how to kill a wisp? Same thing here.

Bandersnatch
Almost the same as zombies, except on the lower floors they can sprint at you and do pretty good damage. They have low HPs though which makes a giant's stomp the ideal way to neutralize them. Windmill works too, but the most widely accepted method is firebolt revolver to keep them at bay.

Wendigo
Treat is as a fit ogre that has higher defense against ranged and magic. The wendigo must die a specific death for the mirror witch to appear - it must be slain by a giant wielding an ice pole, and ice poles (if you don't have one) only drop when the wendigo uses stomp. Your main problem will be keeping this creep alive for your giant to bash as by this point, you will probably be able to dust him in short order if you aren't careful. To be safe, let your giant buddy solo him.

Mirror witch
She has many dangerous powers and broad array of defenses but she can't use any of them if she's pinned on the floor. Safest way to fight her is seriously to gang smash/windmill her. That may sound kinky but you'd better do it or it is you that will be raped. :P

Don't be fooled by her hotness, she's as cold as ice.


Longa Hide and Seek - (as Atrata)
The anti-climactic final dungeon - Atrata has no hope in fighting anything in here so just get used to using the "hide" action that is available to all elves as you hit those orbs. Remember it drains mana so drink up when you are running low.

Wednesday 25 July 2012

Return of the Yantar

My journal through Stalker Soup - a mega mod for Shadows of Chernobyl! You can follow the rest of the story here!

At the Garbage a band of 3 mercs pulled a really tough ambush on me (flanking from both sides) probably because of what I did to their buddies at Cordon previously. Survived that and started restocking on grenades from the Duty guys at their road block. Also got a nice sniper rifle from one of them for giving him a whole bunch of flesh eyes. At the entry to Bar the road was again full of anomalies and sure enough the Burer and his pet pseudodog were still lurking about. It was bright daytime now though, and with the new rifle I managed to one-shot the Burer between the eyes before he could react. The dog was a bit more annoying, hiding in the tall grass so I just kept pushing forward and when I thought he was almost on me, I turned around quickly and Saiga'd the mutt in the face.

Some strange things happening at the South watch to Bar when I got there though - they were being attacked by bandits from INSIDE the base? Maybe a group escaped from the arena? No matter, they handled the threat though half the guards were now dead. Handed in a whole bunch of things at the Bar itself, upgraded my radar to detect bloodsuckers, and left my duty armor (found it off some one at Dark Valley ages ago) to be repaired and in its place am finally using the science suit Kruglov gave me at Yantar. Speaking of which, that's where I need to head next - to find another lab. You mean the one that kills me as soon as I step in there? Yeah probably that one.

Didn't end up using the science suit for very long as there was a large group of exo-skeleton mercs waiting for me in the Wild Territory (the ruined city) whom I sniped down from far. Managed to salvage one of exo suits and continued on my way past the multiple anomaly fields to get the high ground. Good thing too as I saw new blips on my radar moving around really quick. That upgrade was working. From the rooftops I also eliminated a large pack of psydogs that had taken residence there as well as the odd sniper or two. Finally after what felt like a long trek I made it back to Yantar and was given the task of escorting my old buddy Kruglov to take some readings to develop an anti-instant death helmet. For a scientist he handles a gun well, and we completed the task through a good number of zombies with ease (though we did both black out at one point - good thing no zombies were around then!). Once we returned to the mobile camp Sahkarov used the data to complete the device and I was finally ready to look for the next undoubtedly spooky laboratory.


Exoskeletons are cool. This is the Sarcos prototype.

Tuesday 24 July 2012

Becoming the Dark Knight

Sometime after human characters complete G3 you will be able to start the Path of the Dark Knight quest, and here are some quick tips on getting through it.


Unfortunately it's less Batman and more Venom.

Ciar - Again
You'll meet blue ratmen and burgundy sickle laghodesas now, they are a tiny bit stronger than their counterparts you have previously faced but the main difference is they multi aggro. Windmill is a good option on taking out these things quickly.

That Cursed Armor
After a solo trip into Rabbie and revisiting Albey in TNN you should have the completed set of armor. The black wizard will try trick you in getting you to "taste" the power before you decide. This is a lie. If you do that, then your decision is made and you -will- become a dark knight (you can delay it though). If you want to destroy it and stay a paladin you must go to Tarlach -before- running Barri RP. People that opt to don the dark armor cannot revert, ever. Paladins can however, later change their mind and change later on.

Dark Knight in Barri (as Ruairi)
Regardless of your choice you get to try out the dark knight skills as Ruairi in the RP dungeon. He is even more overpowered than before with the transformation and even the ogre warriors at the end should pose no problems for you.

Black or White
As a quick comparison to help you decide:

Paladins gain a fixed amount of Str, Will, Dex (based on paladin skill ranks). Ideal for melee and ranged people. Will is especially handy for the Fighter knuckle skills.

Dark Knights gain a random amount of Str, Int, Dex. Compared to a paladin of the same level, one will be higher, one will be lower and one will be equal. More deal for mages due to INT gain. They also get an additional skill that lets them "control" a monster for a short period.

Monday 23 July 2012

Generation 3 Tips - Holy Hell

Now that you have gained your transformation from the previous story arc this should be a breeze right? Well, yes and no. Generation 3 has two parts, the first being quite easy but very annoying due to running to Tarlach often, then the end game which is ridicoulously hard.

Statue Restoration
First part mainly involves fixing up statues that the fomors are breaking as you mostly revisit dungeons you've already beaten. I'll just quickly cover some opponents that may be new to you at this point.

Arr' they be Pirates!
The pirate skelies in Rundal are the same as normal skelies, only that differently attired ones can multi aggro you. Keep this in mind as you take them out.

Heavy Hitters
The Rundal Cyclops and Barri Ogre Warriors (one of whom you have fought before) have similar AI. Probably a good idea to use transformation against them just to be sure, or if you want to be extra safe, pet revolver at your leisure. Obviously don't fight the Ogre Warriors all at once and be warned that the big ones have more HP and deal more damage.

Rabbie Bosses
If you open the boss room while alone in Rabbie you'll face a succubus, an AI you have defeated before as Tarlach in Generation 1 and has similar AI to the necromancer at the end of Generation 2. Also good to note, she only runs as fast as you making it easy to smash and run until she decides to give up and repeat. If you open the boss room with a team you will be lured into a trap by a single goblin. Killing it will spawn a large cluster of stronger multi-aggro gold types with archer backup. If you can snipe or pet revolver the "bait" goblin, you will be able to handle the army that follows in a more organized fashion.

Random Math
There's a low chance you may encounter either of these while clearing Math - Pocket mice and Giant Skelies. The later ones are actually the least dangerous skeleton type and are best dealt with windmill since you can hit all of them with their large hit boxes. The pocket mice are just slightly better than rats, and so long as you don't use magic on them will pose no threat.

Baol Infiltration
Here's where things begin getting insane. This solo dungeon is designed as a "stealth" mission where you need to get past a whole bunch of high damage dealing guards to reach the boss room. You can't use magic other than healing and if you talk the guards will detect you. Every single door is locked via orb system which means being unlucky could result in your death. Fortunately you get an anti-fomor robe for the duration of this which enables you to be invisible from all guards except the hell hound type, but if THEY detect you - ALL of them detect you. This makes them your most major threat. There are many strategies to get through safetly on the wiki. I recommend using the rock throw action and bringing a long bow to lure the hell hounds out from certain multi-aggro death should they appear. It is important to wait for their bodies to disappear before continuing as even "dead" hounds can detect you and alert the other guards.

Alternatively if you are high level enough (R1 smash and combat mastery) and have a strong mana shield to back you up, you can simply kill all the guards. Elves have an even easier time as they should be able to "hide" in between hitting orbs. Be warned that the hounds aggro very fast though so it may pay to get behind the orb before kicking it.

Baol Final (better bring help)
With a mix of boss type creatures with multi aggro in every room for SIX floors, this is possibly the second most difficult dungeon in the entire game (after Peaca) you'd really better bring (preferably strong) help. Also be sure to bring firewood, bow and arrows and 100 HP potions ONLY. Picking up or bringing any of the lesser heals WILL get you killed later. You'll most likely need a bunch of party feathers and a friend outside with advanced feathers should all of you get killed. If your team all have high ranked windmill then over-lapping WMs can help a lot. There are a bunch of new opponents here for those who haven't been running other dungeons prior to this.

Giant Worms
A variety of giant worms are down here and they have brick loads of heavy stander and mana shield. Best dealt with by a high level archer. They will never aggro first, so if you need a breather in between a wave try to not to disturb one of them.

They are ugly bastards but they won't attack unless provoked!

Nightmare Humanoid
Same as the boss in the Paladin's Passive Defense quest, just lots more of them! Remember to firebolt them to make them change color as melee is ineffective if they are Red or White.

Argos and Giant Headless
Just like ogre warriors, only uglier. They both have heavy stander and while Argos' have mana deflector, the Headlesses are almost immune to arrows. If you are keeping one dude back in the previous chamber as your resser with party feathers, make sure he keeps well away from the combat room as they have attacks that can still go through to adjacent chambers.

Dark Lord and Dragon
No need to fight the Dark Lord this time, just stay away from him and his pal until the dragon shows up. Once it does you'd best put down a campfire or two to provide cover from its fire breath. Hopefully you also have a full stack or two of heal pots and bandaged all your wounds prior to entering. Last time I fought him he couldn't do injury (black) damage but could wipe out your health in one shot. If you are at full health before this happens you'll go into Deadly which gives you time to drink up again. Arrow revolver or just plain ranged attacks by the campfire provide the best way to destroy the dragon (aside from demi-god powers you will get later) as you can hit him even while he is flying. Note, the campfire blocks the explosion so you must be standing opposite to where the breath attack *lands* as opposed to opposite the dragon itself as he can toss it anywhere when he is flying!

Obsidian Enchant
Ideally you still have the "goddess" weapon from G1. If that's the case, you are best off stacking this reward scroll on that item. :)

Sunday 22 July 2012

Generation 2 Tips - Give me my Transformation

After having gone through generation 1 you will find this a piece of cake even if all the dungeons must be run solo, and possibly will finish the whole arc in a day or two. Just some quick pointers on potentially (lightly) toublesome parts:

Barri Paladin Training
Kobold Miners are the only "new" opponents you'll face here at the end of the dungeon. They multi-aggro so just pick your targets carefully - they shouldn't take many more hits than your standard goblin.

Math Paladin Training
Multi-aggro from kobolds and kobold archers will be much the same like Ciar's goblins and nothing new for you. You will eventually be joined by four allies (about time) and can just sit in the corner while they do the rest. Your friends can actually hit you too, so if you join in the melee just be aware of that.

The Price is Right
You'll need to find Price a few times in this story arc and the next (plus he sells good ego food). He keeps switching location every 12pm in game but fortunately Mabinogi World has a tracking system you can use to catch him. It's on the right hand side of their page.

Ceo Island
To reach Aer you'll need to visit Ceo Island which is only reachable via auto-marked moongate (at night), unless you have a friend who has an alternate means of returning there. Do not stray off into the section where the golems are sleeping, because they are pretty tough and worse - if you start killing them more and more will spawn in that little area. You can come back to try this later when you are stronger. :P

Mythril Mine
Is just like Barri but you will potentially encounter your first Ogre Warrior at the boss room in which case you will likely die a few times. Despite him being a fatso he can and will outrun you. His hammer does very heavy damage so only dry defense if you have a good shield and high rank in that skill. Also his armor gives him heavy stander, which makes normal melee a precarious option. Burning magnum/range is an option if you do enough damage, but up close you'll have to rely on wm/counter or firebolt/counter. If you have a pet though, this is a good time to learn to use pet revolver. Simply summon a pet, get it to attack the ogre by shift+click (better for the pet to use "smash" if available due to the ogre's heavy stander) and as soon as it delivers the damage, recall it before the ogre can retaliate. Wait 60 seconds and repeat. Obviously if you have more pets this goes faster.

Ciar Spirit Dungeon
The main problem you'll face here is being in an unfamiliar form and perhaps lacking skills you usually use. This is not a problem as this is pretty much a lesson in defense and counter. The wolf and bear have 3 hit combos (normal attack), not sure about the hawk. Also, as the wolf anyway, you are better off ignoring your smash attack as you can do a lot more damage with your normal chain. At the boss room, the giant version of yourself can make itself invulnerable - but this can be turned off for a time by countering its attack. Don't worry too much about it though because if you just fight properly you will naturally be turning it off anyway. For a speed run, you can ignore enemies that you aren't required to kill as you should be just as fast as them and be able to escape combat range.

Barri Final
This dungeon must be getting boring for you now. Your only "new" enemies are at the boss room.

Golden Golem
Lots of HP. For the first part just let your buddy do his thing and wait in a corner as it will be invulnerable. For the second stage you will have a power boost so you can either fight it like you fought the golems at Ciar and Fiodh, or just pet revolver it. Remember that even with your boost it will still be dealing pretty good injury damage so all those potions you brought won't help mid-combat.

Necromancer
After Tabby is done you will be one on one with the final boss. Your enemy can and will summon skeletons in a small cluster around them when you first are detected or attack. As you know, skelies are dangerous so to avoid this just ranged attack the necromancer and let them chase you away from their guards. Once isolated you can concentrate on it, and be careful of its heavy stander and bolt magic. You should be getting used to it by now right? If you have fought a succubus before then this enemy has similar AI, just less friendly. :P

Passive Defense Powerup
Humans that gain the Paladin transformation should then pursue the Passive Defense quest that comes after beating the necromancer. You'll need to collect pages for a book from various people in Emain who will each ask different things. Note you can probably buy the three 110cm Rainbow trouts from your servers merchant channel or the house board. Once that straightforward bit is done you will be tasked to head to Coill, and if you've never been there there are a few new enemies waiting for you.

Ice/Fire/Lightning Sprite
Much like wisps these critters enjoy blasting you with bolt magic. They have defenses in everything but are more vulnerable to magic attacks and though they single aggro, a room with mixed sprites will be very dangerous. Smash or Windmill will still work well as they don't have a huge pool of HP behind their "armor".

They can also be made into a refreshing beverage.

Invisible Imp
Just like normal imps - only invisible (duh) making them harder to target. You can either hold down alt to get a lock on them or just windmill as that hits everything around you, visible or otherwise.

Nightmare humanoid
This horse demon (also known as tikbalangs in the Philippines) can change what it is immune to based on its color: Red (melee), Blue (magic), Orange (ranged), White (everything), Black (nothing). Knocking it on its butt with a firebolt will make it change color. Alternatively if you catch it in Final Hit (ideally not when it is red or white) it cannot change color, nor is it immune to alchemy skills (ever). Since there's only one of him, it should be pretty easy to beat. Pally mode will all but ensure your victory.

Saturday 21 July 2012

Generation 1 Tips (Part Two) - Everybody loves Dougal

Second part of my Generation 1 tips! You can find the first part here.

Fiodh (fastest with help)
Again, new creatures that could be troublesome for a newbie show up here - once you get to mid-level they shouldn't be a problem though. Fiodh is also a really big dungeon (more like a sprawling ruin) so it may take awhile to clear if going through solo. If you are trying that, then be sure to bring the same gear as from Ciar earlier as you'll probably need it.

Jackals and Bears
I hope you can recall your beginner battle class training sessions. Jackals behave just like wolves. :P

Snakes
Know counter and defense but tend to drop defense quickly so don't try smash them when they have it up. Normal attacks will be just fine since most have low HP but they can bite hard (especially white ones) if they catch you. Fortunately none of them in this arc are poisonous... those will come in later. :P

Werewolves
Can be very problematic for low level characters as their claws do injury (black) damage and they have heavy stander. This means there's a chance they will auto-defend any non-knockback melee attack. Simplest way around this is to stick to smash, windmill and counter. I'd suggest shooting them from far but they usually appear in locked rooms so you'll need to learn how to handle them up close.Later on  you'll be one hit killing them, but for now it's probably best to bring two stacks of bandages along.

Gorgons
Basically armored cows. Again, avoid normal attacks as they too have heavy stander and just like the werewolves they tend to spawn in locked rooms. Expect to spam your heal potions a bit the first time you meet them, and don't use smash as your opening attack. Alternatively if you want to practice fighting them, head to Iria and travel North of Qilla until you find the young short-horned gnus. They have similar AI but are just less aggressive (gnus never attack first).

Rabbie-Albey (fastest to solo as Mari)
Nice looking scary dungeon you'll get to visit in person later on. For now the fastest way through is to use an ultra speed potion and arrow revolver everything until the dark lord shows up. Once he does I recommend magnum shot to prevent him from teleporting. Like everything else that teleports, he can "bug" out and become a non-targetable statue. If this happens you'll have no choice but to change channel and go back to get another set of glasses from Tarlach to do this dungeon again.

Barri Crossing  (fastest with help)
The only thing that maybe new here for you are imps. These little fellas pack quite a punch if they zap you, but they are paper mages. One combo should be enough to kill them. If not, use defense quickly or alternatively use magic on them yourself. They are more a lesson in kill sequencing (start with isolated ones) rather than combat skill.

Tir Na Nog
Welcome to Australia! Erm I mean, Tir na Nog. Sorry, easy to mistake with all these dingoes (again wolf ai) running about. There are only two other things lurking out here.

Map of Tir Na Nog! :P

Zombie
The graveyard here hosts a large number of zombies who are pretty much immune to ranged and magic attacks, plus they have heavy stander! The safest way to deal with these slow moving scum is to windmill, and this was originally the best place to train it. These days you can travel to Tara and do the Their Method mission for more accessible zombies though. Also, if you are quick, you can open with a smash if they haven't noticed you yet. Anyway, you will need to kill one of these scum to bind your soul here (ie. enable respawn), otherwise death with no one nearby to res here or in the nearby Albey dungeon will lead you back to Bangor. Where is your goddess now ey? :P

Giant Worm
Dangerous, heavy stander and heavy hitter. Best avoided if you are low level, and like the dingoes - you never actually have to fight these ones. They behave like snakes.

Albey Green Gem (safest with help)
The first of three runs you'll need to do through Albey for Generation 1. There are no statues to revive at here so bringing backup is a good idea. Also note that if you didn't complete the soul binding quest of killing a zombie, your respawn point will be Bangor. There are also a number of new opponents waiting for you here:

Ratmen
Think of them as talkative and tricky goblins. Their windmill can do some decent damage but otherwise, just fight correctly and they'll die quick.

Gargoyles
The bane of Albey dungeon. They can easily one hit kill low-mid level players and have the same AI as gremlins (annoying). They will probably survive a standard combo or smash too if you haven't got your skills up yet, and enjoy throwing an ice bolt to stun/negate their prey's defense before attacking up close. The "heavy" version also boasts heavy stander and more HP. Shoot them from far when you are given the opportunity, but they will also spawn in enclosed rooms with you which means you and your team simply have to fight well. You'll need to get used to them as they'll show up in the next two dungeons in this story arc too.

Albey Black Orb (safest with help)
A more dangerous run through Albey as gargoyles are going to be more plentiful. Two "new" opponents you'll be facing here are:

Armored Skeletons
They're just like normal skelies except that they now have heavy stander. Avoid normal attacks if possible and remember to focus on the one "!!" aggroed on you as they only aggro one at a time. A mix of windmill, counter, magic and ranged attacks are all good ways to beat them.

Ghost Armor
You've fought them before as Mores and Mari, but now you may not have powerful magic or a strong bow. It is still advisable to shoot them from far but if you are going in close be careful of their lightning bolts and DO NOT open with smash as they have high intuition. Just attack them normally and put up defense to catch their magic or sword if they are still alive.

Albey Goddess Final (safest with help)
Five floors and no respawn points. Better also bring some firewood and a bow if this is your first time in here. A few more "new" enemies to contend with here if you haven't been done the beginner hunting quests. Don't worry, all your old friends from the spiderlings to the heavy gargoyles will also make an appearance.

Hellhound
Often found as the boss of Math dungeon, you'll be locked in with two of them and for a change it is better to be up close and personal with these instead of "middle distance" which they will dominate with their magic. Just treat them as big wolves that happen to have firebolt. :P It takes some time for them to load firebolt so pounce the minute they do.

Lycanthrope
A variation of the old werewolf, you're only going to run into one of these and the best way to beat him is to just spam windmill, as any other skill could level him up and restore his life to full.

Dark Lord
Ideally fight him after taking out his body guards. He can still teleport but if he does that ususally means he is using a normal attack making him open against counter and windmill. Hopefully you've picked up the Goddess pass to "save" your progress just incase your team dies to him or the final boss.

Glas
This giant, four-armed gold eating monster can shoot lasers from its mouth, summon gargoyles and has a really quick regeneration rate. There are three ways to beat him - first, bring a high level friend to seriously just one hit KO him. Second, setup a camp fire at the door and use burning arrows on him (does injury damage which he cannot regen), or the classic way which is to kill his summoned gargoyles until one drops a "seal scroll". Pick it up, burn it on a camp fire to gain 60 second invulnerability and 100% injury dealing rate and beat him up. All methods are equally fun. Again, don't worry too much if you die - as long as you keep picking up the Goddess pass you get to redo this and the dark lord fight over and over until you win. :)

Goddess Enchant
Hopefully you have a fully upgraded and fully repaired, favourite weapon by now as you have only 6 hours after receiving the reward to use it.

Friday 20 July 2012

A Quick Respite... of Madness!

Thought I'd give you a breather from all the Mabinogi classes I've been posting. Don't worry though, there is still more of that to come - and more adventures in the Shadow of Chernobyl too! Not yet for the Skyrim journal though, at least not until I get around to getting Dawnguard. :)

So what have I been up to? Well, playing Mabinogi as one may have guessed but I switch it out with other things too like watching Masterchef Australia (season 4) which is about to head into it's final week! While that's a bit sad I'll get 3 weeks more Masterchef with the All-Stars version starting up right after. Probably gonna watch some Olympics too since that's about to start up shortly, but it will have a tough ask as it needs to beat Fringe which my wife and I are currently watching. Damn it's a good series, and I highly recommend it.

Also been playing the Walking Dead game (hey I think the next season of this is going to start up soon too), which is pretty cool but as of now still unfinished. Getting killed left right and center in Arma II as well, but I haven't put too much time into that yet - no, my recent adventures have all been in a little game called "Call of Cthulhu: Dark Corners of the Earth". It's a little dated but is still very awesome, engaging and immersing. Almost like a single player run of the board game (which I am also a fan of). Alas it isn't quite open-world though so I won't be doing write ups for that one - it is better if you experience it for yourself! Nothing quite like being chased by a shoggoth or being driven mad by the great Cthulhu. ^_^

Got myself a newly forged "Beasts of Iron" novel from my buddy Paul C. Goosen too, and being a friend of his thought I should pimp out his work! Go have a looksie for yourself!

Anywho, been awhile since I put up random links for y'all so here's some stuff that's caught my interest recently:

Ultima Forever - because the Avatar can never die.
Deadpool vs the World?
PC Game Evolution - Brings back some memories!
Dirty Laundry (courtesy of Juris) - a cool Punisher short

Thursday 19 July 2012

Generation 1 Tips (Part One) - The Stoned Goddess

Now that you've had (over) 7 days worth of classes it's probably time to start the first main story arc: Generation 1! In the next few posts I'll give some quick tips to get through the "dangerous" parts of Generation 1! I am assuming you've been through the beginner battle class board sessions prior to doing this.


Grave of the Snowman
Any time you need to go into the snowy region North of Tir Chonail (which will be a lot) be wary of the coyotes. They have wolf AI but can tear a low level player up quickly if you don't fight well. My suggestion is avoid them and jog past them, preferably NOT in combat mode as it makes them aggro faster.

Alby RP (fastest to solo as Ruairi)
Nothing here should pose a threat to your character, so certainly nothing will be a problem for the overpowered Ruairi. Drink up the ultra speed potion and crush the spiders and bats into oblivion. Remember, all the spiders and bats you encounter in all of G1 only know defense and have single aggro. The bats will also never attack first.

Barri Black Wizard (fastest with help)
May want to bring help here if you are still new to the game as you'll probably be meeting new types of opponents for the first time.

Gremlins (various)
Dangerous hard hitting bastards. Ideally magnum shot them from the adjoining room or hallway since they have low HP. Ice bolts work well too. If you have to melee them avoid using defense and instead use counter/wm and normal attacks. When they fly around like spastic idiots don't chase them as they'll usually get first hit in - instead load up a windmill.

Flying Sword
If you don't use magic on them, they aren't that bad and will only attack one at a time. If you can't slay them in one combo, defend often to block their strikes or lightning bolts.
Wisp - harder to read than the average monster (may pay to study their language) and hits moderately hard. Lure them if required to deal with them one at a time.

Black Wizard
Can be a big danger for low-mid level players. If you are opting to have ranged combat you'd better make sure your shots hit (hope you brought a longbow too). If he fully charges firebolt it's around 500 damage if it connects (I know from experience! :P). Otherwise close in and tear him up as fast as you can to prevent him chain firebolting you, but don't do that if his wisps are nearby - lure them first.

In Mabinogi, all black wizards are evil.


Rabbie RP (solo as Tarlach)
Featuring possibly your first encounter with skeletons in enclosed spaces, Tarlach is not so good at melee though and is not the guy to practice fighting skelies with. Fastest and safest way to clear this is to use the ultra speed potion and make use of 3221 icebolt on everything. If you don't know what that is, it is a good time to learn: Charge 5 ice bolts, fire 3 at baddie, charge one, fire two, charge one, fire two, charge one, fire one. If the situation allows though, always charge back up to five.

Math RP (fastest to solo as Mores - twice)
The most fun RP dungeon in this story arc. Fastest way to clear everything is again the ultra speed potion and this time because Mores has chain casting, use lightning bolt on everything. More fun if they are standing clustered together.

Ciar (as of this post bugged and must be run solo - don't forget to touch the end statue to finish this quest section)
Since you're going in alone I suggest you bring a good stock of healing pots, bandages, a shield and if you aren't a giant - a longbow, arrows and 5 pieces of firewood. Just to cover what's in here if you haven't tried the dungeon prior to this quest:

Goblins and Goblin archers
You'll encounter mixed aggro here with them, try to prioritise the archers first and if your windmill is good enough, use that to clear them out quick. If you have a pet, don't forget you can use it to help. You can out bow them if you're carrying a long bow and have an empty corner to work with as their aggro range does not cover the entire room.

Skeletons
They can hit hard as you may have seen in Tarlach's RP earlier, and this bunch also carry bows. However given that the boss room door is open (giving you space to flee) you can just magnum shot them to death - they only run as fast as you and if you go far enough, they get bored and return to idling. Alternatively you can just melee them too as they have no armor. Don't wake up the golem while doing this though! If a skelie is not moving you may as well load up counter or windmill. Usually they run around like idiots though so you can catch them with normal attacks. You probably will want a good shield (kite or better) if you are going to attempt defense to parry them though.

Golem
This is the second weakest golem in the game but can still cause problems with its windmill and stomp attacks. It is unwise to fight it while fighting skeletons so lure it or its buddies to fight them one at a time. This big boy can easily outrun you though, even an elf so don't try to escape unless you've got a fast steed. If you are opting to shoot it to death I recommend using a camp fire to gain fire arrows (x2 damage). Otherwise if you are going to be upclose, bring a shield and fight well as he can KO you really quickly. Don't panic too much, if you die you can always respawn at the goddess statue and try again. You'll be facing a slightly stronger variant in Fiodh soon.

Wednesday 18 July 2012

All-Guide Binder

This was orignially a post to put all the skill guides floating about into one place to make them easier to find, but thanks to J. Meyer, it seems someone called Ninjams had the same idea first! (Not updated for awhile though). This is mainly his list I am putting here as it doesn't hurt to have more than one place. If the authors of these wish me to remove the link please just let me know, alternatively if you know of more please leave a comment so I can add it! This post will probably keep growing as time goes on. To find the rest of my classes please see the binding post.

GAMEPLAY

General
The G15 Trading System
Guide to shadow missions
Pet FAQ/guide
Saanis guide to Ant Hell (Connous Underground)

Combat
Shadow Wizard hard solo: A case study on massively multi-aggro handling
The warriors third hand: The role of pets in melee combat
Fundamentals of combat
Guide to your skill rank

Technical
Lag/computer optimization

SKILLS

Combat
Offensive Alchemy, By Naii
Alchemy 102 (who needs 101?)
Elfs powerful range attack, Final Shot
Defense to the extreme, Wind Guard

Windmill
Using Windmill Effectively
A guide to ranking Windmill!
Windmillers' guide to breezing through Ciar advanced

Life
Production Parties
How to rank the blacksmith skill :by Waui of Alexina
Meiyas blacksmithing guide and reference
How to rank the Enchant skill: by Zyrus
Potion Making, your fantasy (Sooni)
Sooni's guide to Refining
Sooni's guide to Tailoring
Herbalore, why don't you try it? Sooni
Paladins weaving FAQ
Yogurt's guide to trapping spiders behind obstacles
Sooni's guide to Weaving
Magitekkefka's guide to Cooking
Life skill guide: Refining
Kaxiyus music guide

CHARACTER

Melee
Guide to Human Melee skill builds, equipments and enchants

Ranged
Daisuke's archery guide

Magic
Zeo's Magic Skills Guide
The Royal Wizard!

Race
Elven handbook: Everything you need to know about elves

ITEMS

General
The Guide to Winemaking
Inuri's/Emiles guide to Merchanting
How to play an elf for free in G15 (an equipment guide)
Guide to tax and fee evasion
How to get wool bags and farm holy water
Dungeon pass guide - the best methods

Spirit Weapons
Ego jewel feeding tables
G15 Ego Guide (Information on Capped Egos and Transfer)

Enchantment Sets
Second chance: The low hp build
The tragic hero
Enchanters set; By Pataterose
Cp Gear the key to Mabinogi!

Foods
Ninjam's guide to getting fat
Fathippos guide to being healthy

WEB
Pikablus short guide to getting a good IGN without having to use x's or numbers

Tuesday 17 July 2012

Home is where the Herbs Are

My seventh Mabinogi lesson! To find what other classes are available please see the binding post. :)

At around level 10 you will be awarded a homestead which is a nice isolated piece of land that you can cultivate and design into whatever you like. With the right items it can help your production rates and training and can provide an easy way to meet up with friends - just right click their name on your friend list and select go to homestead. The most important function for me however, is that you can use it to grow herbs... lots and lots of herbs.


Not that type.

It is a good idea to invest in getting 30 base (green), 30 bloody (red), 30 sunlight (yellow) and 30 mana (blue) herbs when your homestead has enough points to support them, because once you start making your own potions you will be saving, or even making, a bit of gold (if you decide to sell the finished product). You can harvest the herbs from dungeons or acquire them from other players, but once once you have a patch growing in your own backyard it becomes very easy - just harvest them till you get another 30 and you can setup another patch and so on and so forth. To help get Holy Water from Kristel's part time job, you may also want a few apple trees to save you some time finding one in the Dunbarton outskirts.

Potion making is easy. You just need a potion concoction kit and the required herbs (one green and one of a different color) to make the 50pt potions. Red is Hp, Yellow is Stam, and my favourite - Blue is Mana. If you spend some gold and get base potions from the nearest healer to go with any of those they become 100pt potions which is what I always create to save on space. If you find yourself running out of mana when making potions, simply stand next to an open mana tunnel in Iria during the day as it will fill you right back up very quickly.

Why are mana potions so valuable to me? Mana Shield. This skill can literally negate serious injuries and has kept me alive on more than one occasion since it basically stacks your mana pool on top of your HP. It can be a little tricky to learn initially, since you have to go hunt hobgoblins in their village which is only reachable by flying mount (get a ride from someone) or rafting, but I highly recommend getting it as soon as possible. Once you are in the village you can either just "finish" hobgoblins your friend has knocked down or if solo hunt archers (and shamans if you can handle them) exclusively. Avoid the warriors if you are attempting this in your first month of playing (and definitely ALL "ancient" titled fat ones) as they can take a fair bit of punishment and dish out big hitting combos. Hobgobs are not really something newbies should be going up against but just think of them as a good test for your combat skills. Fortunately if you die and are not yet at -100% exp, you can respawn right where you fell so just don't die too much ok? :P

Monday 16 July 2012

If I were a Rich Man

My sixth Mabinogi lesson! To find what other classes are available please see the binding post. :)

You are Gold!
Gold is the main currency in Erinn and it will come to you from all the previous methods[link] (other than aging and rebirth) as well as from slaying critters and opening treasure chests. Note that your Luck stat can affect how much gold appears in both those cases. You can also make gold by selling goods to other players - it will require a paid account to setup a shop in town, but it is free if you are advertising via party sign or the trade forums on your chosen server.

Fomor Scrolls and Hunting Quests
Collecting 10 fomor scrolls can earn you some extra gold, as can hunting quests that are available from a few npcs - though those tend to eat up a bit of space. Scrolls that you should always collect are: mimic, skeleton wolf, and metal skeleton (while doing g1 anyway). There are many others, but which to collect depends where you most often hunt.

Ferghus
Cheap repair can save you a ton of gold later, even better is if you use gear that is cheap to repair especially when starting out. Wooden blades are very good for this purpose and pretty easy to come by so you won't mind if Ferghus breaks them from time to time. ;)

Farming
Another way to make a decent profit is by renting a farm at Taillteann. Blatt the farmer has 90 plots per channel (remember where yours is) on offer which cost 30,000 gold to rent for a week plus 500 gold for whatever type of seed you decide to grow. I suggest tomatoes for your first run as they are the easiest to manage and even if you somehow stuff it up by performing very few actions (of the 10 you are allowed to do per real day) you should still at least double your investment. When I was doing it I was making around 220,000 per week, and that was with a lot of competition (less people are farming these days). Given that your bank account funds are shared between your characters it is an idea to have one of your mules tending to it once every 20/30/40 minutes (depending on your last action) while you continue to build your main for the majority of your play time, rather than having him constantly hop back to the farm to "poke" it himself.

Currency of the L33t
While fomors carry gold it is not actually their main currency - they use it to distract a large, gold eating monster you will encounter a few times in the game. Instead, they trade with Ducats and now that some of them are "good", will happily trade them with you too! They can be used to buy some pretty nice things but the catch is, unlike gold - it cannot be traded amongst players and can, as of this post, be earned in one of two ways. For a newbie though I do not recommend either till you are confident in your combat ability.

Merchanting
Moving goods from between trading posts is the main method of earning ducats. As a bonus you also get gold and exp for successful runs. Your first few thousand ducats are often best spent purchasing cargo carrying options from the travel ogre as they will always pay themselves off rather quickly. The main problem with this is that while doing this you become a target for bandits and, given that you will be at 50% combat efficiency when moving goods and will almost always face a multi-aggro situation, it could be a painful experience. I recommend moving as a group to at least have support especially when bringing elephant-loads of goods. Some people even offer their services as caravan guards - a good idea on some routes. Remember too that trade between Dunbarton, Cobh, Belvast and Scathach Beach will yield zero profit so you can't rely on the safety blanket there.

Bandit Hunting
This is for veteran players only - the bandits they will be facing will always be of veteran or master level and the bandit bosses themselves are quite overpowered (stronger than some generation bosses) and can only be faced one on one. Best to avoid this until you are sure you can take them on.

Secrets to NX
Not really in-game currency but Nexon Cash is sometimes the only way to get useful things such as pets or spirit weapon repair potions. If you are a cheapskate like me and don't want to spend real money getting NX there are still other ways available to you. Obviously being "gifted" NX by someone else is nice, but Nexon often offers free methods to earn NX via watching trailers, filling out surveys, winning competitions, and random lucky picks. Keep your eyes open on their main page and forums for these opportunities.

My kingdom for a Horse
I cannot stress enough how useful having a pet is. If/when you get your hands on some NX they are perhaps the first thing to spend on. Make sure you research first into what you need! Do you need to speed up transportation? Need more inventory space? Or just want something that can kick butt? Most people go for a mount first. I went with a minibear because I didn't mind to jog everywhere nor need lots of space. Regardless of what you get, you should train / level up your pet ASAP. Fastest way would probably be with help at the black mongeese again, but remember you should be playing -as- the pet yourself to reap the most benefits (with or without help). While playing as your pet you will also no longer see enemy skills. This is good training for you (the gamer) too, to read your opponents without relying on that bubble.

Furthermore once you start using your pet in combat you should optimize its AI to better suit its role. Not a coder? Don't worry, there are many kits already setup out there for you to cut and paste - just have to find them. This is the one I use and in one on one melee, my bear now rarely loses so I can just send it off and not worry about it as it will take care of itself. For the record, it still does more damage than my higher level thunder dragon. ;p

Sunday 15 July 2012

Fastest way to gain AP

My fifth Mabinogi lesson! To find what other classes are available please see the binding post. :)

Ability Points are the most prized numbers you need and will almost always be short of. You spend them to rank up skills and if you want everything at Rank 1 you will literally need thousands of them; and more with each new skill introduced into the game. There are four ways to earn AP:

Quests
Some quests give AP on completion. Of note are the Generation 1 quests give 70 odd all up so if given a choice do NOT skip it. Furthermore all quests give Gold and exp so they are usually all worth doing! Maybe not so much the timed daily ones like harvest wheat or gather eggs though.

Leveling Up
Each level you gain gives you 1 AP. As you level up this begins to slow down as more and more exp is required to level. For a newbie, your fastest EXP gain outside of quests will come from one of two places. First one is shadow Missions - Which one becomes a time vs effort decision on your part as "Defeat the Shadow Warrior" is not particularly fast to complete. If you are solo and are confident in windmill you may want to try the Tara shadow mission - "Their Method" to chop up zombies instead. Alternatively if you can handle them, the black mongeese (especially angry ones) at the human mark at Rano in Iria provide one of the best risk vs exp reward outside a dungeon. They can be tough customers though so I hope you've practiced up against those wolves from my last post before trying to fight them. Faster still is if you get someone to train you (probably on black mongeese again) by letting you into their party and giving all the exp to finish. They knock em down, you finish. Need to be very good friends or very persuasive for this to happen though.

Each week there is also a banquet at the Tara Castle that just spits out EXP for as long as you are inside the hall (for 1 hour). It's easy gain if you are going to be AFK but later on you will be able to make much more than it gives if you are actively killing stuff. Ideally, you should try aim to reach level 40-50 before having to rebirth.

Exploration
Each exploration level you gain gives you 1 AP. It is just as good as normal leveling up. The safest way for a beginner to level these up is to venture to Cor (or get a lift there) and do the circuit around the village. You will need an L-Rod and space in your pack to dig up some artifacts. Generally they spawn in "lines" everywhere so if you find 2 you can probably find a few more. This also means if you find one you should circle it and listen for beeps. Eventually you'll know where all the spots are by memory anyway if you do it very often. Be warned that the Giant Millipede does pose a threat to low level characters, and if he spawns DO NOT use smash on it.

Keep an eye on your exploration level too because there are some levels where you -MUST- do an exploration cap quest. Your exploration level will cease to advance and all excess exploration experience will be lost until you complete it! It's a good idea to get these out of the way as each character only needs to do them once. The maximum exploration level you can reach is 25 and you should aim to reach somewhere between 15-20 per rebirth.

Colombus got a lot of AP from it.

Aging and Rebirth
Every week you gain some AP based on your age. The younger you are, the more AP you gain. However, unless you are planning on paying real money for character cards to rebirth,  you will only be able to use the free rebirth given when your characters reaches an age of 20. If you started at age 17 thats three weeks before you can rebirth again. Why is rebirthing good? Because it resets your level and exploration level back to 1, making it easy to gain again, while keeping your already accumulated AP. If you can reach the ideal levels (or better) above within three weeks then you probably should be rebirthing to age 17. Otherwise adjust it accordingly to maximize your age/rebirth cycle.

Teaching an old dog new Tricks

My fourth Mabinogi lesson! To find what other classes are available please see the binding post. :)

The combat system in Mabi is quite different from most other MMORPGs. Certainly from the ones I've played anyway, and thats a pretty big list. After doing your newbie quests (Giant / Elf / Iria Human) or taking classes at the School (Uladh Human) its probably a good idea to go and nail down some good combat technique with the Beginner Battle Class board that you can find at Tir Chonail, Vales, or Filia. Outside of that, the immediate areas around those towns (and Qilla too) also provide good opponents to practice basics on. Some extra notes on these before we continue that I don't feel the game teaches too well:

Combat Mode:
Try to always be on combat mode (space bar by default) when going into battle. If you don't I've found your first combo into a second skill to be more delayed than usual, which can cost you a few HPs if the enemy capitalizes on it.

Normal Attack:
If your fight method involves simply clicking like mad, they you are doing it wrong. This can get you past maybe some foxes and racoons, but wolves and up will eat you for breakfast. You have a set number of swings you can do based on your weapon and each click should be a concious action. To chain another skill at the end of the combo, you should activate it while you character performs the last attack in his or her chain. With practice you can also add an extra hit to weapons that are 2-hit or more. It's just timing and delay.

While the normal attack is the standard "defense" against Smash, don't forget you can use it while your opponent is preparing another skill. Regardless of what it is, if you reach it in time, you should be able to strike before the skill loads. This goes for you as well: When you are -preparing- a move you are technically open for attack!

Smash:
Sometimes, when executing this you will run up to your target and just stand around/lag like a buffoon - especially when the targeted foe is distant. To combat this, when you load up smash run up beside your intended victim first and only click on them when you are a step away.

Windmill:
Is perhaps the most important skill in the game, as it is your best and often your only multi-aggro handler in close quarters. This along, with refining (trust me it's hard to rank later on), should be your number one priority in ranking up first regardless of what you ultimately want to be. Remember you want -all- the skills. Windmill also ignores protection which means it does a ton of damage even against targets on defense, but if you don't kill them they will have free hits on you. When the skeletons at Rabbie do this to you, you'll see what I mean. :P

Magnum Shot:
For humans especially this should be your staple opening bow attack at the beginning for luring things when you have space to use it (elves may opt to use mirage missile depending on the situation). Stuck in a room full of monsters is probably not the ideal spot but out in the fields or in rooms that allow you to run back through hallways you should have no reason to *not* use this (well unless your targets all have natural shield). With it, you can kill off many baddies and avoid getting into multi-aggro spots. Later on you will be following this up with arrow revolver (humans) which will all but ensure your target doesn't reach you. Later on you will probably switch it out for Crash Shot which does more damage in crowded rooms but for a newbie that will be far yet. Giants will not have this ability and will probably have to resort to bolt magic for ranged lures.

Time to Train - One on One melee:
One of the best critters to train up your combat ability (as a player) on are wolves. They are very readable in combat and move fast enough to catch you if you do something wrong. I suggest finding the correct type that you can take some hits from AND can take a few hits from you. If the battle is too one sided then you will not be learning much! There are quite a few types around Tir Chonail and you can find them East of Vales as well. Mongeese use similar AI outside Qilla and North East of Filia but you may have to travel far to find the correct type to practice on.

Alternatively for more EXP make the trek to Taillteann and take the mission "Defeat the Shadow Warrior" (basic) from a Shadow Mission Bulletin board and head to the Stonehenge to enter the mission. You will be locked in with small groups of enemies but they will only fight you one at a time. Except for the archers, you'll need to be on your toes and kill them quick. :P As a general rule of thumb, while you are free to attack anything it is the enemies that have the "!!" mark that are actively seeking to kill you.


Good sparring partners for new players.