After setting the stage in
part one, the bad guys are on the offensive and you'll be spending loads of time in the shadow realm to hold them back. "Fomor Counterattack!" makes you run regular shadow missions to display this and they are all quickest to be finished on BASIC. Later on you will not be given a choice on difficulty. :P
Defeat a Bovine (fastest with friend)
Your first important scouting mission is to wander around and get stoned again, just like the previous mission. Only this time you can bring a friend and instead of looking for a dude with wings you are looking for an ugly cow. I guess the enemy eats these cows so, eliminating one will make them starve or something? Who knows. New baddies anyway are:
Shadow Shire
Evil horsey! They smash hard and will multi-aggro with whoever they are with (never alone). Probably on the same "to-kill" tier as shadow lancers. Being horses they gallop around pretty quick and will generally be the ones to catch you mid-skill if you aren't careful.
Crag Cow
You've fought these already as Leymore but perhaps this single cow is your first as your actual character. Treat it as a gorgon with -heavier- stander with more HP and does more damage. Smash, windmill, and counter your way to victory.
Defeat the Shadow Warrior (solo)
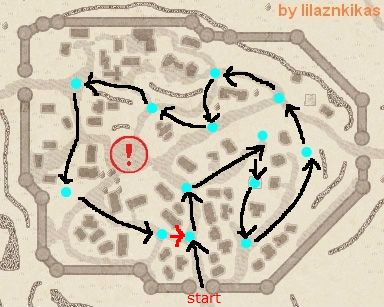
Seems the city is being held by a single fomor bastard with a few minions. This is a simple run through the shadow city against mostly single aggro spawns. Once you clear all the orbs you get to fight Lo Wang... erm I mean, a Shadow Warrior who is essentially a beefed up shadow fighter. Get used to them as they will come out as regular baddies soon. Also, it will pay to develop a route to follow to hit all the orbs on the map as you will be doing this a LOT - sometimes even twice in one mission.
That's the way I do it. Props to lilaznkikas for base map.
Taillteann Defensive Battle (3-6 people, 6 ideal so everyone has someone to chat to)
Now that you've taken the city you need to defend the gates against enemy forces as they march in. Well that's a lie, more like you need to defend the gate guard NPCs as enemies "beam in" from the mothership. Each pair of NPCs have no chance in surviving the onslaught so it will be up to you to kill them quickly. Windmill and pets are highly recommended. Be sure to also heal the guards if you get the chance between waves as they need to survive around 20 minutes. The giant guards are particularly moronic in this mission. Should a pair of NPCs fall, follow the road back towards the center where the spawning will continue. If too many pairs die, game over - restart. High level dudes running this on basic can pretty much hold a gate solo, but it's just... boring.
Battle for Taillteann I (fastest with 4 people)
After your efforts in the previous mission the town has fallen and is now overrun with enemy forces. Good work. :P These scum are slightly better armored than previously and have more HP. They're also fortified behind barrier spikes and ice mines. To clear the entry quick you can get a buddy to call Adniel and dragon strike the first group out of the way. Alternatively rush the right most side where there's a gap between the wall and barrier. If you are mounted when you hit an ice mine, you can dismount and unsummon your steed to negate the effects. You can also use an L-rod to spot them and disable them with range or magic. Their archers can shoot over the barrier spikes so flank-charging is a good idea. There are no orbs here, so just circle the roads around the town square to find any opposition. Once you get in, you will meet a new baddie:
Shadow Commander
Gold armored dude is the "final" upgrade of a shadow fighter and he comes with instinctive reaction (don't open with a smash if he is idle), an ability to summon numerous snow golems (usually when near death), and a very fatal life drain which targets everyone in a set radius. He glows red and is technically invulnerable when this happens so unsummon any pets giving him more HP and back off yourself - you'll only be able to walk but if you have evasion you can use that to cover more ground faster. Final Hit is a good way to stop him doing anything if you've got it, otherwise strong windmill, normal attack or magnum range will suffice.
Defeat the Shadow Wizard (fastest with 8 people)
Since you beat the last mission the fomors have moved a friggin army in this time - as you will see in possibly your first orb run marathon, you'll need to clear the circuit twice and be facing pretty much everything you've already fought but in bigger numbers and in mixed spawn, so plenty of multi-aggro here. Second circuit provides slightly stronger enemy combos so the easiest way to go about this is just bring a big team to trash them quick. You -can- do this solo but it takes some time and skill. At the end you'll face a shadow Wizard Dude who is almost exactly like the shadow wizard chicks, except stronger. He can teleport around too, often jumping behind his intended victim. You can catch his teleport easily with a windmill so other than that, just treat him like one of the girls.
Conflict! An unexpected Battle (bring four people)
The fomors decided to setup a field camp outside the city (which I guess is the unexpected part in the title) and you are to assist an allied squad to wipe them out. Only problem is the enemy is fortified behind barrier spikes and ice mines (which you'll have no time to detect/disarm), they are elite troops, and should even ONE of your allies die (happens easily) you fail. Transform before entering as this is a very short but difficult mission and have two guys flank the barriers to take those archers out ASAP while the others protect the allied soldiers out front. It is possible to flank and call dragon air-support to eliminate the back rank quickly but you have to target the zone carefully - friendly fire will often result in mission fail.
Gay Times at Coill (as Elatha)
After all that fighting you are rewarded with some incubus on incubus action! Elatha fights better with magic and can still do decent damage with his wand so don't bother switching to the longsword. The only thing new in Coill for you will be an incubus at the end. In general they are bad bad news, have high levels in all passive defenses and can use advanced magic, along with doing high melee damage. Use a firebolt/icebolt combo to deal with him but be ready to counter or windmill if he gets too close.
Secret Experiment Time (easiest with friends)
Now it is back to the shadow realm to collect 8 clues. No new monsters but since it is now at the "level of the party leader" they may be stronger than usual. Also, everytime you run these missions they get longer and harder so to prevent arousing the bad guys so much you should work with friends, better if these friends are also looking for the clues. Clues appear at the end of each run, 2 per chest. One set - based on the in-game time you entered, one random.These are not tradable themselves but the treasure chest keys ARE. If you have buddies that don't need the clues have them hand over their treasure keys to help complete your book more quickly.
Set clues are:
12:00 AM - 3:00 AM, clue #1.
3:00 AM - 6:00 AM, clue #2.
6:00 AM - 9:00 AM, clue #3.
9:00 AM - 12:00 PM,clue #4.
12:00 PM - 3:00 PM, clue #5.
3:00 PM - 6:00 PM, clue #6.
6:00 PM - 9:00 PM, clue #7.
9:00 PM - 12:00 AM, clue #8.
Alchemy Experimentation (best bring a friend)
There are a few evil alchemists in this mission so bringing a friend to help deal with them is a good idea. Leymore will assist for one part of the mission too, don't let him die or it's game over. At the end a named Shadow Commander will appear and he will be tougher than the last one you fought. Team windmill or enough final hit should do the trick. If you prefer range then light up a fire first so that at least your first shots will do double damage. You have a lot of room to move - the whole city in fact. Just look out for those summoned golems as they will pack a punch.
Couracle's Heart (best with three people)
Similar to a higher level clue-hunting mission, by now you should be familiar with all the spawns and how to best deal with them. Your main adversary here is time. 30 minutes isn't very long to complete your circuit so speed up the process by bringing friends to clear the orb sections quickly. Don't forget to bring some paper to draw the damn thing once you get there. :P