Sunday 30 April 2017

Ben-Hur (2016)

More CGI, less screen time.

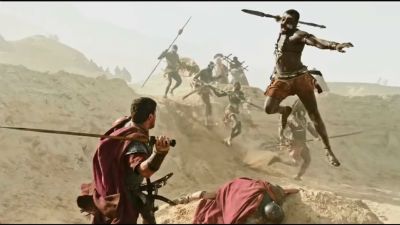
This Ben-Hur has almost exactly the same story as Charlton Heston's version, only it is condensed - shaving over an hour of play time from the previous movie. This Ben Hur is also much more of a party animal than before, and does a better job of building and harboring hatred on his "revenge" trip as the film goes on.

A fair amount of death always gets a thumbs up from me!

The antagonist, Messala, is quite likeable here which is good given how they change the ending. He also kills a -lot- more people this time around. Morgan Freeman is present too - as a less jovial and much more serious horse racing manager.  Jesus also gets actual face time this time around, instead of just seeing him from a distance, or his back, or his hand / foot.

Ben-Hur's mother and sister get a bit of a shaft on screen time, as does the boat captain and Jesus (which is made up for his face time I think), but I do quite like their take on the naval combat this time around. The mother and sister cut is probably the worst of the condensation, but the rest of the film does make up for it. The two films are also a nice comparison between really good CGI of the new one vs actual tactile sets of the old one. Both certainly have their merits.

All up I give this 3.5 chariots out of 5, which scores it a tad higher than Mr. Heston's version, purely because it is of a more reasonable length which makes the question of "would I watch this again?" be a definite yes.

Saturday 29 April 2017

Today I Smiled: A Soul less Dark

Hope you all enjoyed what is probably the last entry of my Dark Souls tale, since that was the final DLC. I certainly had fun playing through it! I am getting exhausted with this daily posting schedule though, especially this year which seems to be flying by. It's the end of April already and I feel it's like I've done nothing productive. Anyway, the Skyrim/TESO story will carry on for a bit more but with more gaps between them as the content there finally catches up to where I actually am. Yes, I do like holding posts in reserve.

I plan on making my Nameless creative writing experiment, which has taught me that drawing eats a ton more time than writing, fill the gap for a bit: and I'm going to break that wall of using my own art per post in that story since it is really stifling myself. Back to generic pictures we go! To leave you with more entertaining stuff, here are some youtube vids: the Indian Nod, the Indian Alphabet Song, and just to have something non-Indian, Dork Souls III - a cartoon parody which is more effective for those who have played the game, or have read through my playthrough.

And just for kicks, one more Dark Souls video - apparently the armor of thorns does damage when you roll into things, so of course... we get Dark Rolls! Have a good day everyone! :)

Friday 28 April 2017

Dark Souls III: Midir

Tales from Dark Souls - spoilers ahead! You can follow the rest of the story here!

It takes a number of goes before I realize the fight against the bridge dragon is really simple. Hide behind a rock, wait for fire to pass, run out, hack his feet twice and run back - repeat. Eventually the winged beast falls off and finally lets me enter his massive cavern boss room where he is MUCH angrier. I am unable to find anyone to help for this fight, so I have a lot of deaths attempts which slowly improve as I begin to be able to read the beast.

Of course he has a laser too!

I'm thankful I fully upgraded my Fume Ultra Greatsword earlier, since hitting his face requires some vertical range. Also, strafing right at mid range happens to avoid most of his attacks, except for his flying one in which running left is better. Ultimately, he dies without beating Nunja Friede's record of the most times I died to a boss. As a final challenge I decided to go hunt the dragonslayer in the swamp (since I did his job for him).

He is really tough to duel, but not that bright. In the end I defeat him simply using a robe (for running) and a longbow. This is made really easy when he gets "stuck" on some ruins at the edge of his leash. I just fill him with 99 poison arrows and 33 large arrows which ends him and earns me his armor. Bwahahahah. Done here, I return to the painting girl (in the still slow burning church) and give the child her Uncle Gael's soul. She is thankful and shows me her painting...

It looks like an odd grey nothing at first but as I focus it starts to look like spiraling hues of blue. I can't seem to put my finger on it as I am drawn closer and closer. I also can't seem to breathe...

Thursday 27 April 2017

Dark Souls III: Physics Breaker

Tales from Dark Souls - spoilers ahead! You can follow the rest of the story here!

Beyond the Church I arrived at the chamber of the sleeping princess, who wasn't so much sleeping and more long dead. Poking her destroyed the illusion that is the Ringed City (much like I heard that if you poke Gwynevere you reveal the true "dark" Anor Londo in the first Dark Souls) and left me standing in a massive desert of ash and ruin. Apart from one of the Princess' Knights who I put down, the only other one here is Gael... having grown to a massive size by cannibalizing the "people" here. He then turns to me with murderous intent.

The boss fight against Gael is certainly one of the "prettiest" in the series, with the physics defying knight flying in unexpected angles as he attacks. I only attempt two practice runs to read his basic set before summoning sunbro DogHow and S***A to assist. They are clearly experts at the fight and we have no problems as Gael switches to his even more beautiful phase 2 and phase 3 sequences, ultimately slaying the old slave knight with no friendly casualties. Thanks guys!

A picture cannot capture how awesome this fight is.

This just leaves one mysterious boss fog I found in an earlier secret passage which I couldn't enter. At first I thought it to be a bug, but it turns out there was a pre-requisite to open it first... defeat the dragon on the bridge.

Wednesday 26 April 2017

Dark Souls III: The Spears of the Church

Tales from Dark Souls - spoilers ahead! You can follow the rest of the story here!

The boss fight inside the church is one of the most devious in Dark Souls. While there is a respawning painting assassin NPC during the fight, the main boss is... another player. Yes. I hope you've been practicing your PvP skills because one of the many crazies who enjoy ruining the day for others will be summoned as "your boss fight", and given the people who sign up for this covenant would be the ones who PvP at every opportunity - lets just say are not novices.

Said opponent cannot use Estus heals which is great, but everything else in their arsenal seems to be ok. They also get an AoE spear summon and an automated magic spear spell hovering above them (at least I think its automated). The "Spears of the Church" Faltran and Bloodfire did their duty of blocking my progress. Rather than hoping one will just throw the fight (which probably isn't going to happen, given the game) I decided to tilt the battle to my favor as much as possible, summoning sunbro Andraste to assist and coating my axe with the bleed buff.

Pre-combat shot. The fighting is too intense later to take screenies.

Spear of the Church Anayaki still put up a good fight, but with my tricks and a late "suddenly switch opponent" tactic by Andraste and me, Anayaki was caught unprepared for an axe to the back. Being unsure of who to block against next ensured both of us hit which ended the boss fight in our victory. Thank you Andraste! Funny that someone named after a goddess/saint helped me get through this section! ;)

Tuesday 25 April 2017

Dark Souls III: Cardio is Important

Tales from Dark Souls - spoilers ahead! You can follow the rest of the story here!

Lapp is here at the bonfire too, apparently he is looking for a cleansing monument of some sort to restore his memory. I tell him I'll keep an eye out, but due to the next section being filled with scary flame sword knights, giant thorn knights, and turtle man priests I go back to my old tactic of running and dodging past everything! The theme of "Going Down" continues here and I ultimately end up in a large swamp, being chased by another dragonslayer armor!  My pretty good sprint is ended by unexpected dragon fire though, as a large black dragon does a fantastic job of covering his stone bridge from intruders.

Crispy Pata. Ow.

It takes a few goes before I find the nearby bonfire which makes scouting the swamp much easier. More importantly it lets me work out the timing of the bridge crossing which leads me straight into a skeleton filled catacomb. The Moaning Knight invades here but I never actually encounter him since I move too quickly through the area and to the other end of the catacomb where again the dragon blocks my path.

In true Dark Souls style there is no "going around", its all timing, dodging and blocking. I manage to axe a dragon toe or two as I run past it into the next building which simply opens a shortcut back to an earlier bonfire of the area. Yup, all of this was pretty much to open a locked gate! To be fair it also opens the path to the church that I've been trying to reach since getting here. Little did I know of the boss waiting inside.

Monday 24 April 2017

Dark Souls III: Panic Power

Tales from Dark Souls - spoilers ahead! You can follow the rest of the story here!

After dealing with the angels I find a giant pit where two large flaming demons await. I don't get very far on my own, but luckily I am able to enlist Lapp and "the not yet dead afterall" Slave Knight Gael to assist in handling the aggro and defeating the phase 2, laser blasting demon prince that spawns from the corpse of one of the dead bosses.

Axe-ing open some demon noggin!

One familiar demon transportation ride later I am taken to the very awesome looking Ringed City and encounter its first guardian, an undead giant who summons an army of ghost archers! At the same time I am invaded by Juliet of Astora who uses these unmoving ghosts to slay a Blue Sentinel who comes to my aid. Knowing my lack of PvP experience I withdraw back behind some cover a top a spiraling stair where Juliet knows I'm planning a trap - but cannot see me, so resorts to gesture insults, one benefit of no in game chat I guess.

I wait till she's close and with two hands on my axe I run out early, timing it as she is coming up, which elicits the panic response I am hoping for. I manage to nick her too with my wild swinging but her own dodge is what ends her as it sends her off the broken stair and plummeting to a messy, insta death. Not what I had planned, but I'll take it! Using timing, a calm approach and the supplied cover lets me get through the ghost firing squad and survive attacks from a handful of weak assassins beyond. The next bonfire is right there.

Good thing those ghost arrows can't go through solid stone. Lol!

Sunday 23 April 2017

Dark Souls III: Laser Angels

Tales from Dark Souls - spoilers ahead! You can follow the rest of the story here!

Disorientation gives way to a familiar, spiraling landscape of cities crumbling in on each other as an angry black sun looks down. Looks like I'm back here, on the field of flowers where I had once defeated the Soul of Cinder. After shaking loose the cobwebs in my mind and muscles I found a new bonfire, one that leads me to the top of the Dreg Heap and offering one of the best views of the spiraling chaos anyone could ask for.

Something calls me forth, and I begin my descent through the familiar yet different, gravitationally warped locales and while the numerous undead here are quite manageable with funneling tactics I soon encounter a most curious and dangerous adversary - evil angels. These flying laser turrets are the bane of my exploration in this region, especially once I reach the mired swamp that everything seems to be pooling at.

Dodging that is pretty tough.

I meet the amnesiac knight Lapp, on this journey as well as Zoey the desert pyromancer who I best by kicking off a high ledge. Well technically, she actually dodged off and killed herself. It's the ever watchful eyes of the angels that pin me down here for a long time, until I finally find their weakness... hidden cocoon zombies who are individually quite helpless. Killing one insta kills the angel they control so I make it a point to find them and slay them all out of spite.

Saturday 22 April 2017

TESO: All these People Suck

Adventures of Skyrim - spoilers ahead! You can follow the rest of the story here!

While King Emeric recovers from his death in Bangkorai (lol) I head to Rivenspire next where there is a civil war afoot. Normally I'd let these people just kill each other but when it becomes clear the dominant Montclair faction is composed of vampires I definitely have to intervene. Just to semi complicate matters there are three "good" vampires too, but its because of their leader and an Ayelid doohickey atop Mount Doom "the Doomcrag" that this whole thing started. I am also annoyed to learn that this vampire is one of Emeric's closest friends. What sort of King lets vampires wander around? What a douche.

It comes complete with aircraft warning lights!

Ultimately I kill all the bad vampires and the lead "good" one sacrifices himself to remove the ayelid relic (that can just change people into vamps via gas) from the Doomcrag. How? By giving himself and the WMD to Molag Bal, who takes it into Coldharbour. WHAT? That's not a F*ING SOLUTION! Emeric himself shows up after the fact and then asks me to choose from the remaining surviving candidates on who should become overlord of this region, because having many equal people didn't work. I pick the devout and peace loving Baroness as to weaken the Covenant as much as possible.

In the process I also beat up a cave full of orcs (a rarity here) and prove to Malacath, the daedric prince they worship, that all orcs are worthless pieces of shit. In town I also am  surprised to find Captain Kaleen, stripped and tortured in a basement no less. Seems like the kinky Redguard spy she was hunting turned the tables on her. After helping her kill the bastard I take her back to the docks. I was headed there anyway to gain passage to the Alik'r Desert anyway. During this I notice that in all the scuffles with those vampires, one managed to get me good on my arm.

I'm sure it's nothing.

Friday 21 April 2017

TESO: Daedric Tharn

Adventures of Skyrim - spoilers ahead! You can follow the rest of the story here!

With Stormhaven mostly freed from Vaermina's manipulation I rode on into Bangkorai, a region under attack by talking crows - and more reachmen. Where the heck do all these guys come from? After convincing the local Queen to do her job I am sent to stop this threat and quite humorously succeed in doing so by accident. You see I was racing towards a distant Dolmen which I ended up missing entirely as other heroes shut it down - and found myself near the main reachman camp. A little stealth and snooping about led me to their hagraven leader who I had no trouble in slaying.

That force turned out to just be the appetizer though, as the main threat soon revealed itself to be the Imperial army led by one Septima Tharn who are all allied with Molag Bal (of course). With the help of King Emeric and his timely army, we pushed them back into the Southern Desert region of this huge zone. Then I got side tracked in rescuing elf maidens from a Troll den and helping a nereid eliminate a bunch of Hermaeus Mora's followers. Take that you kill stealer. In the region I also have to outhunt Hircine's chosen hunter and defeat an avatar of Mephala - guess the Daedric princes really like this zone!

Explosions are effective against ghosts!

By the time I catch up with Septima Tharn after all those distractions, she has already defeated Emeric's army and killed the arrogant king. I sneak into her camp and have an epic duel against her, one of the best fights in the game so far - ultimately I slay the sorceress and have the Queen's forces wipe out the remaining Imperial douches. Through convoluted events I end up with King Emeric's soul in my backpack and have the option of resurrecting him. I am soooo tempted not to, but ultimately give in and revive him. In exchange I tell him to withdraw all his forces from the war. He says he'll think about it.

Thursday 20 April 2017

TESO: Perchance to Dream

Adventures of Skyrim - spoilers ahead! You can follow the rest of the story here!

After cleaning up some left over Bloodthorn cultists at Glenumbra I move onto Stormhaven which is plagued by a totally different set of cultists who worship Vaermina and her nightmare realm. They are actually quite effective in getting people to behave irrationally, causing wide spread disturbances and even a high profile assassination. Eventually I reach the capital, Wayrest, and meet High King Emeric. He tasks me with stopping this nightmare cult and in exchange agrees to hold the advance of his army camped near the Rift.

Just as well he does for he too eventually falls under Vaermina's spell and I save his sorry Breton hide from... himself, basically. And Vaermina's beholder champion, Galthis. Vaermina is notably upset at this, trying to trap me in her domain but the attempt is so poor it barely is worth mentioning. I guess she's really out of steam in this region at that point. For my efforts I am rewarded with a pet monkey. Lol, what?

Awesome!

Anyway, this area is also where I complete my first solo dolmen, defeating liches, a naga and a dread grievous twilight demon in a really long fight that involves hiding behind many nearby pillars and trees. It's not the most efficient nor the fastest way to clear a dolmen, but I certainly felt heroic after doing so.

Wednesday 19 April 2017

TESO: Beyond Reach

Adventures of Skyrim - spoilers ahead! You can follow the rest of the story here!

I came to as Orla shook me awake at the entrance of some crypt with a squad of pact soldiers behind her. Disoriented, she advised that during a skirmish against Reachmen I had fallen down the short pit which is serves as the standard foyer to most of the burial mounds here in the Rift. Whoever designed it must love flooding tombs. After clearing my head of that vivid experience, I assisted her in eliminating the local Reachman boss within, though all her soldiers died in the effort.

Turns out the Reachmen have some giant allies.

From there I continued pushing back the Reachmen and their Worm cult allies all the way past Ivarstead. I also execute a survivor from the Bleakrock invasion so long ago, since she had fallen under the sway of Molag Bal's promises to restore her fallen family members. For a change of pace, I also have to rescue a school of skalds who inadvertently got Vaermina's attention, unleashing nightmare forces on their little island.

With that done I earn the "Hero of the Pact" title, despite not being able to stop one particular threat in the region - a neighboring valley filled with an army of Lionguard troops! There are far too many for me to handle alone (group dungeon). Fortunately they don't seem to be going anywhere so I figure I might be able to talk King Emeric into standing down. Unlikely, but it's worth a try! One short Wayshrine trip later and I find myself back in the Covenant controlled land of Glenumbra.

Tuesday 18 April 2017

Dragon's Dogma: Breaking the Loop

Adventures of Skyrim - spoilers ahead! You can follow the rest of the story here!

Since I've collected enough of these heart shaped wakestones (revive item) I am now able to open an even stranger portal in the Everfall which leads me (alone) into a strange plane where the floor is water, and it is only decorated by a single throne which a dude in a white robe sits on. This god "Seneschal" turns out to be Savan - and he is behind the whole mess that brought me here in the first place!

Apparently he is bored of being god, and the only way to step down is to get an arisen to kill you and take your place. The only way to make an arisen is to summon/create a dragon into the world, and just like me - he killed his dragon a long, long time ago. This ultimate showdown is a bit lack luster, even when he summons his man at arms as well as Rose for a 2 vs 2 fight. He is easily defeated, and asks that I kill him. I oblige and become the new god.

Savan prefers to talk than fight.

I can tell right away why this is boring though - at this point you can only visit Cassardis or Gran Soren as a ghost figure and can't interact with anyone, apart from attacking or throwing them around. I do think of a way to break this cycle though. I need an arisen to end my loop? Well, I am an arisen right? Seppuku time! Yes, the game makes you kill yourself. It works - and the watery floor gives way to clouds as Rose and I fall into the sea...

Rose eventually washes up at Cassardis beach, inexplicably wearing my armor. Was I just a figment of her imagination this whole time? Madeline helps her up and assures her that the two of them will manage brilliantly. At this point I have the option of starting New Game+, but then I wouldn't really be breaking the loop would I? :P

Monday 17 April 2017

Dragon's Dogma: Ur-Stronger

Adventures of Skyrim - spoilers ahead! You can follow the rest of the story here!

Due to the weakness of the magic archer class in the last entry, I opt to switch back to assassin for more stabby and less pew pew. We also recruit Ila the knight and Sapphire the mage to replace our fallen comrades and go on a patrol just outside the gates to test their mettle against hell hounds and gargoyles. During this I also test out a really cool skill called Masterful Kill, which is basically a Batman parry. It is awesome. So awesome I decide to bring the team back to the catacombs to take on the pair of living armors.

This time, since I'm squarely in the physical damage role I use Masterful Kill to counter the scum slowly chipping away at the armor until both finally break (it does take a few tries), leaving the ghosts exposed to the powerful magics of Sapphire and the insanely powerful magics of Rose who freezes one to death and tears the other apart with tornadoes. I am elated that we finally won that very tough fight!

With that it is back to randomly exploring the Everfall, and eventually come across the lich and metal golem once more. There are no issues this time as my purely physical arrows destroy the golem's amulets early into the fight, and with everyone focusing on the lich it doesn't last very long either. While most of these areas are somewhat repetetive we do come across one beautiful zone occupied by easily slain evil pawns... and the Ur-Dragon!

I should have known a dragon would show up...

This thing is just HP bar after HP bar and whose massive body hides a huge amount of hearts. It does say that this is a multiplayer boss, one designed to be chipped away on so I just do my part and when it flies off to recuperate I get the team out of there since we would not win a battle of attrition. Ila and Sapphire leave at this point, terrified of the beast they just fought against.

Sunday 16 April 2017

Dragon's Dogma: The Everfall

Adventures of Skyrim - spoilers ahead! You can follow the rest of the story here!

After dealing with the hydra, we finish off the cockatrice that had fled to Soulflayer Canyon. Its petrifying breath is inconsequential as we have a lot of curatives at this point. We also swing by the home of the Dragonforged but find he is gone. I suppose he died with the dragon. Eventually we return to Gran Soren to actually investigate that huge hole properly - it turns out it is the Everfall which has grown into a cascading hole filled with mini dungeons.

I join other adventurers in exploring the place, defeating a beholder (more magic based than the one on Bitterblack Isle), a magic ice drake as well as another with a heart on it's back and groups of ogres and cyclops. What catches us off guard is a lich and metal golem team though. The metal golem's medal weakspots aren't on its body, and instead are scattered around the chamber - its easy enough to destroy them except for the one floating high in the sky because said medals are immune to magic, so my magic arrows did nothing to it.

I'm just... catching my breath...

In the meantime the lich was busy not just summoning undead, but also casting petrification spells - and since we used up a large portion of the curatives against the cockatrice in the canyon both Cedric and Margel are soon turned to stone! The metal golem then uses its explosive laser beam eye to explode statue Margel into tiny bits and crush statue Cedric underfoot. While Rose and I manage to kill the floating lich afterwards the golem is too problematic and we are forced to withdraw - recalling back up to the city.

Saturday 15 April 2017

Dragon's Dogma: Just can't Win

Adventures of Skyrim - spoilers ahead! You can follow the rest of the story here!

Turns out the dragon's death isn't the end of the game, all it did was darken the sky and it is now raining ash continuously everywhere. Worse, some of the monsters in the country side have grown stronger too so we head back to Gran Soren to get some answers and instead find a massive, gaping hole that has consumed over half the city, including Fournival's cell and Jasper's home. Parkour kid Pip blames me for his parents death. Just can't win with some people.

I go visit the Duke who has now withered into an old man. He cannot believe that anyone could have slain the dragon, and in his madness attacks me feebly with a sword as he believes I took the same deal he did. I easily kick him down, but his guardsmen led by Ser Maximillian come to his aid in an unending swarm - believing his lies that I placed a curse on him. I lost count of how many I kill during the escape/slaughter. Ser Maximillian is among them.

To be fair, spin kicking a duke is probably against the law.

Fortunately enough guards died that they are only congregating now at the Duke's castle, letting us freely roam what's left of the city. Despite that, we leave anyway to do some of the new hunting quests, including putting an end to the poison spitting hydra who has resurfaced at the Shadow Fort. Margel's shield boost is handy which makes it easier to hop up there and chop off its heads, as is Cedric's fire magic which slows them from growing back. It takes a bit of time, but we are victorious!

Friday 14 April 2017

Dragon's Dogma: Aught to Kill You

Adventures of Skyrim - spoilers ahead! You can follow the rest of the story here!

Deciding that it is time to confront the dragon, I return to the Dragonforged who is nice enough to tell me where to find him. He also mentions that when he tried, he lost and is now just a ghost. That does explain why only I can see him! The beasts lair is beyond the Great Wall, guarded by hell hounds, succubi harpies, and gorechimera. It is also strangely familiar in that it is the same place I dreamt of at the start of all this... only Savan and his team were the ones hunting the wyrm.

More awesome than Zhaitan.

We eventually reach it and I am surprised that the tavern keeper Inez is a prisoner here, and the dragon offers me a choice: fight him and potentially end the world, or kill Inez (who represents my love interest I guess?) and live forever... which is what the mad Duke did. Obviously I fight the dragon - and what a glorious fight it is, covering a huge distance as we run through and a top of ruins, shoot at it with ballista, ride on it's back, and ultimately face it in a big arena!

Heat seeking magic arrows are very handy in this fight, but in the end the dragon goes down due to my learning how to double jump and grab onto its chest - followed by daggering its heart ad nauseum. After a long battle, the dragon falls and I eat its soul (Dovahkiin)! Well, not really - but he is nice enough to magically return my missing heart before disintegrating. Afterwards we take Inez back to Cassardis afterwards where she shows her appreciation, by giving free drinks and snacks all around! :P

Thursday 13 April 2017

Dragon's Dogma: There's your god

Adventures of Skyrim - spoilers ahead! You can follow the rest of the story here!

On the road we encounter Ser Maximillian and some guards who are hurrying to the Great Wall to stop some massive Salvation invasion taking place. Since they don't know what I was up to in the last entry, we join the ranks and reach the citadel to find it already overrun by cultists, undead, harpies and armored cyclopsi. There's even a chimera upstairs! At the top of the fort we finally catch up with the leader of Salvation who throws two final liches at us but they are easily destroyed.

Even combined they weren't as tough as the bich.

He then runs to a higher vantage point and begins giving his spiel about the dragon being the god of the new age and is cut short by having the very same dragon (the heart eater), crush him unceremoniously under foot. The beast proclaims he has no love for the Salvation idiots, and renews his challenge for me to face it since I am now stronger. With that he flies off because I suppose he likes playing hard to get.

I take the time to return to Gran Soren where I am surprised to find Madeline back in town, apparently being hunted by the guards for being allied with Salvation! I'm not sure how she escaped from the goblins and while I try to help the guardsmen arrest her, they are idiots and go the wrong way. Madeline thanks me for diverting them with that very unclear quest option and asks for 20k gold to restart her shop elsewhere. Sure why not - I've got gold spilling out my ears at this point anyway.

Wednesday 12 April 2017

Dragon's Dogma: Rescuing the Girl

Adventures of Skyrim - spoilers ahead! You can follow the rest of the story here!

With the rebellion ended the team makes a stop at the catacombs where we attempt to slay two living armours. The problem with these things is that apart from the wide arcs of their seriously damaging sword swings, they are also immune to magic for the first stage and immune to physical damage in the second. Also, unlike the one we fought on Bitterblack Isle which was in a large arena - these two were in a more claustrophobic room. We (and I mean Margel and Fedel) simply couldn't get them to the second phase, and when they killed Fedel I knew we just had to cut our losses and retreat.

My first guess was the dragon.

Just as well too since Gran Soren was under attack - some Salvation infiltrators had resurrected the dead cockatrice Mercedes' troops brought back as tribute to the Duke. We killed the cultists and hurt the beast enough that it flew away, but it did manage to petrify some of the locals. We didn't stay long though as we learned that the Duchess Aelinore had been exiled to another of the Duke's estates where she now awaited execution for her unfaithfulness.

Jasper, the peasant whose home loan I paid off earlier, comes along to help out - carrying a nice disguise for me which makes infiltrating really easy and I reach Aelinore in no time. After a (not so) short interlude to test the bed, I then have to fight out against all the guards I snuck past, as well as more in the tunnels beneath. Fortunately Rose, Cedric, Margel and Jasper meet me half way and the Duchess is whisked off to safety. I'm noticing a theme of vanishing NPCs in this game...

Tuesday 11 April 2017

Dragon's Dogma: Now You See Me

Adventures of Skyrim - spoilers ahead! You can follow the rest of the story here!

After the disastrous events last time, it was a good change of pace to have a simple quest in Cassardis in the form of helping the moronic Valmiro pack a boat for his "great" adventure, but once he had set sail it was back to the capital for some serious business! After switching to the "Magic Archer" class (because shooting heat seeking mana arrows is fun!) Ser Fedel and his aides Margel the warrior and Cedric the mage joined the party to hunt down a thieving ex-court mage and his band of hired thugs.

The wizard played a bit of whack-a-mole with all his teleporting around, but too bad for him he kept going to where my Port Crystals were and was put down very easily. We are then also tasked to aid Captain Mercedes handle a rebellion in that Northern Fort much to her disdain, asking me to stay out of her way. I oblige, deciding to take a back seat in the proceedings. Her forces do pretty well, taking down a Cockatrice en route to the fort and hold their own against the renegade soldiers. Not that I let them, because I'm bloodthirsty like that.

This band is led by Ser Julien who Captain Mercedes challenges to a duel. Julien prefers to fight me but Mercedes insists that I sit out of it so... fine. The silly Captain ends up losing to Julien's mace, and is only spared so that she can be whored to the rest of his forces. Lucky for her, he the "rest of his forces" are all dead. Content he has weakened this continent enough (which is why he helped Salvation in the first place), he withdraws back to his own country, and Captain Mercedes shamefully does the same. I suppose I could go chase them but via game magic all of them just vanish from the fort. Guess they all had port crystals too?

Or maybe Julien just *really* likes goats.

Monday 10 April 2017

Dragon's Dogma: Fool's Errand

Adventures of Skyrim - spoilers ahead! You can follow the rest of the story here!

After what happened last time I decide it's best to adventure outside the capital for awhile, and Madeline the busty merchant decides to tag along. She is unlucky as we run into night-time drake with an army of goblins encounter again, and since last time going for the goblins let the drake breath fire on our charge this time I went for the flying wyrm. It was a faster victory, but not fast enough as by the time I turned around Madeline was gone, abducted by the goblins.

Frustrated I decided to head back to Bitterblack Isle and hunt Death, because I found I had a "god arrow" in my pack. It was tough going fighting or running past the stronger foes such as greater goblins, hell hounds, giant saurians, and a dragon with a heart on it's back this time around. We did find the spirit though and the god arrow hurt it bad (and killed everything else in the area) but it wasn't enough to destroy it.

Well, this was a bad idea.

I was foolish enough to pursue the reaper into the sewers where I thought a run and gun tactic would probably work given enough time. A randomly spawning elder ogre ended that idea mid-chase and while managed to kill it, Rose, Lily and Ingvald were all caught by Death's "sleep AoE" lantern. All I could do was grab Rose and sprint out of the way as Death's scythe cleaved the other two in half with a single swing. After getting away I teleported out of there and back to Cassardis.

Sunday 9 April 2017

Dragon's Dogma: A Punishable Offense

Adventures of Skyrim - spoilers ahead! You can follow the rest of the story here!

While assisting with Fournival's trial I also do some recon for Ser Fedel on the Northern fortress and discover that the troops there might not be so loyal to the Duke. After passing the information on to him I am invited by Aelinore's handmaiden to sneak into the Duchess' tower at night to keep her company? Of course, I have to sneak in because that's an offense punishable by execution. Not 10 seconds pass after entering her chamber that the Duke knocks on her door.

I quickly hide as the crazed and drooling Duke enters, throws Aelinore on the bed and proceeds to ... strangle her. Hmm I guess they like it kinky? Waiiiit a minute, he's actually killing her! I jump out of hiding which startles the Duke out of his murderous stupor, saving Aelinore's life. In thanks, she quickly calls the guards and has me thrown into the dungeon for a good whipping. That guard doesn't go easy! Aelinore comes afterwards apologizing that it was the only way to save my life. I think she just liked watching.

Why yes. Yes I do.

After she leaves I break out of the cell (because, hey - it's me), and while I'm at it free the gardener imprisoned on false accusations in the cell next to me. It turns out that he overheard damning evidence for the Fournival case so I urge him to testify at the trial, taking him personally back into the castle where the guards don't seem to care about the two escaped convicts wandering about. Lol. Guess the Duke is crazy! Anyway, Fournival is found guilty and is sentenced to life imprisonment.

Saturday 8 April 2017

Dragon's Dogma: Audience Gathering

Adventures of Skyrim - spoilers ahead! You can follow the rest of the story here!

I've finally gained enough fame to get an audience with the Duke it seems, who invites me to his castle where I meet all the other Wyrm hunt knights which include Ser Fedel the investigator, Ser Julien the "you have no proof I am a traitor" and the now recovered Captain Mercedes. The Duke himself seems a bit crazy, and I suspect it is his dwarf jester that driving him insane. Highlight of the evening is meeting the Duchess Aelinore though who seems to fall in love with me at first sight? That can't end well.

The duke's steward gives me more things to do such as hunt a Griffon, slay another Salvation necromancer in the catacombs, and aid in the trial of rich, bald-guy Fournival. Supposedly he's doing shady stuff so we go about finding proof of his innocence and or guilt which is as easy as talking to people in town, or more challenging - escorting eye witnesses from other forts as suggested by Ingvard.

Griffons look awesome by the way.

I am disappointed that the wandering merchant Reynard who I had saved so long ago from goblins actually sells falsified testimonies of all sorts, as he feels it should be allowed to manipulate the law into how one sees fit. Someone like that who only is after profit is a person who doesn't deserve to exist in the world, so I joyously finish what I interrupted those goblins from doing long ago, and kill the bastard.

Friday 7 April 2017

Dragon's Dogma: The Demon of Indecision

Adventures of Skyrim - spoilers ahead! You can follow the rest of the story here!

I don't suppose you just want to talk?

The city is home to more of those really tough evil mercs, as well as flying strigoi who are fricking tough and have an unbreakable grab attack which depends on a team mate freeing you. Lily almost fell prey to this. The main attraction though was the large demon residing in the grand hall at the end. As the end boss of Bitterblack Isle he has a whole slew of abilities, the scariest of which is one where he banishes people - as he does to Yennefer!

Fortunately we find a new knight ally in the form of Ingvald who is pretty decent as a second tank, but what really kills the demon are a pair of rusty daggers I found, not because of the piss poor damage but because of the slowing debilitation with each strike that connects and as one can imagine, dual wielding daggers usually ends up with a lot of strikes - eventually making the demon move in slow motion. It's pretty epic when we finally slay him.

Turns out he was once Olra's main squeeze, and an arisen to boot - until the dragon offered him a choice which he couldn't decide upon. His uncertainty eventually turned him into a demon, and Olra is pleased that he is now free from his suffering. This doesn't clear the island of monsters though, on the contrary - without the demon around they seem to all have gotten tougher!? Not that it's my problem though - with my task here done we warp back to Gran Soren. I'm now on level 57.

Thursday 6 April 2017

Dragon's Dogma: A Tale of Women

Adventures of Skyrim - spoilers ahead! You can follow the rest of the story here!

With my Port Crystals in place Captain Mercedes joins the team for a brief night patrol of the Shadow Fort, and of course we run into huge trouble in the pitch black forest. An army of goblins assaults us from all directions, combined with a drake from the air. I do my best to keep the goblins off her but she is downed by dragon fire and needs to be returned for medical attention after the combat.

Fortunately our next escort mission, to take the tavern keeper Inez on a short adventure is far more successful since she doesn't opt to go far, or to a very dangerous place. Once she is back to safety I am feeling pretty confident with the strength of the team so we return to Bitterblack Isle and we make our way back to the Bich and his undead dragon. This time Rose is using the same crazy spells it throws at us, Yennefer is whipping it with lightning, and Lily is tanking better since I'm silencing and poisoning the Bich with specially prepared arrows.

That's one p0wn3d bich.

Victory comes at last, and opens another shortcut back to Olra and another route further down which we follow into a flooded keep with stronger phantoms and problematic giant saurians who we need to sprint past, right into really tough evil mercs!? I have to abuse their leash mechanism to kill them. We have another encounter with Death in a sewer but once more outrun the giant spirit. We do have to fight a tough living armor afterwards and destroying that opens a door leading to an ancient city which feels so familiar for some reason.

Wednesday 5 April 2017

Dragon's Dogma: Placing Ports

Adventures of Skyrim - spoilers ahead! You can follow the rest of the story here!

Near the Greatwall is a mini dungeon called Soulflayer Canyon which serves as a "not so shortcut" back across the map and is home to lots of ugly critters. While traversing it, Barnaby is once again put to sleep by snow harpies and this time since they also manage to ice me and have the rest of the team dealing with goblins one of them picks up the sleeping fool and spirits him away. Presumably to make baby harpies, followed by Barnaby steak. We never see him again.

Easiest cyclops kill in here!

We then journey far past a windy valley that doubles as a bandit camp and encounter our first golem! Again, good idea for this creature - powered by magic immune disks that serve as its weak spots. You can't pick and choose though, you need to get them all - and with one in the palm of its hand and another in the base of a foot it proves to be a good challenge. Eventually we reach the crumbling Bluemoon Tower we had seen all the way from the other end of the bay at Cassardis. I love the draw distance in this game.

If you are wondering why the heck I'm going to these places it's simply to place Port Crystals (as I mentioned to Coppertopper in the comments previously) so that I can just warp back to them later. It's certainly pretty handy for the cascade of hunting quests I've been assigned. Everything from rats to Death. Yes, there is a quest to kill Death and while I know where to find him I don't see how the heck I'm meant to do that one.

Tuesday 4 April 2017

Dragon's Dogma: Safe as China

Adventures of Skyrim - spoilers ahead! You can follow the rest of the story here!

Back in the city we recruit the sorceress Yennefer (taking a break from adventuring with Geralt I guess?) who has an awesome lightning whip spell and are also joined by the Pawn Guild manager Barnaby on our next outing since he wants to take a more active role in ending the dragon threat. Too bad he is an idiot as demonstrated on our first outing to the Northern hill where harpies manage to keep putting him to sleep with their singing.

We save him from that and from many the big white dire wolves in the region, managing to meet an old guy called the Dragonforged who supposedly once faced the dragon too. He's not very forthcoming with information at this point but does give me some cool stuff to help in my quest. We also explore the dead woods where Sara died previously and take out a few chimeras. At the very center of it is an Abbey of nuns, because apparently that's a "safe" place? Lol.

Tell that to all the prowling chimeras!

We continue up the mountain, fighting past a clan of female bandits who become less hostile as we get closer to their mountain top fort. Once there they let us pass with no hassle into a dark marsh inhabited by a lich. He is no match for the team, but is also not as strong as the Bich on Bitterblack Isle. Eventually we reach China - because we reach a massive fortress called the Great Wall, which also is keeping monsters at bay. I wonder if Matt Damon is around?

Monday 3 April 2017

Dragon's Dogma: No Salvation

Adventures of Skyrim - spoilers ahead! You can follow the rest of the story here!

Upon returning the slates to Ser Maximillian, he gives us our next assignment of infiltrating attacking a Cult of the Dragon Salvation meeting taking place in the not so nearby catacombs and A peasant chubby lady named Sara volunteers to guide us there. Right outside the city gate there is a brief encounter where the city guards are trying to save a merchant wagon from goblins which should have been an easy fight, until a griffon comes along and wrecks everyone. Only my team, including the peasant lady, survives as the Griffon takes the dead Ox and flies off mid combat.

I'm curious why these are nocturnal.

Our journey then takes us through a creepy forest, and since night falls as we traverse it we are beset by numerous undead, including the fat "boomer" type that self explodes. One such creature explodes Sara into many directions. Fortunately Lily knows the way too, so we get to the catacombs and fight through even more of the walking dead to the second level where a surprise ogre manages to kill Monterrey by suiciding into a bottomless chasm, with her attached.

Soon after we find the Salvation meeting point and witness that Ser Julien is here, but he runs off as soon as our presence is made known. The ugly leader guy then kills all the gathered members and reanimates them into zombies to fight us, which is really dumb as from experience they are all much weaker than the generic bandits. Alas the ugly leader escapes but at least we open up a shortcut much nearer to Gran Soren for our return trip.

Sunday 2 April 2017

Dragon's Dogma: Settlements

Adventures of Skyrim - spoilers ahead! You can follow the rest of the story here!

After getting Bich slapped last time, we return to Cassardis where the local chief Adaro joins us to settle a few matters including catching a local thief which is easy, helping Valmiro - a wannabe adventurer who is also a moron, followed by taking out a Saurian nest in the well. I suppose if Valmiro's been drinking lizard pee all this time it might explain his behavior. Anyway, after clearing them out it's off to a bandit fortress to retrieve another slate for the Wyrm hunt investigation.

Adaro is killed by a sniper on the approach, so we reciprocate by murderizing the entire place and looting everything we can. We then take a quick detour to the Shadow Fort which is failing in doing its job of "keeping goblins and other monsters out" since it has fallen to those very same goblins. Fortunately they and their cyclops buddies are no match for the team now, and we force them to flee back into the tunnels they dug under the fort.

Siege weapons are fun!

A quick warp back to Gran Soren (which I'm glad they included because walking is nice, but time consuming) and I am asked by the local bald rich bastard named Fournival for aid in evicting a family who cannot pay the rent in one of his properties. I manage to convince the wife and the boy Pip, by simply out parkouring him - but the husband Jasper is a resilient S.O.B. Lily suggests that we simply purchase the house for them outright which would leave us 80k out of pocket but since I've got millions of gold at this stage I figure why not, just to get another quest out of the way. Needless to say, all parties are happy with the result.

Saturday 1 April 2017

Dragon's Dogma: The Bich

Adventures of Skyrim - spoilers ahead! You can follow the rest of the story here!

Since the altar is closer to Cassardis, I decide to trek back there and recruit the towering Nord gal Juliana and take the team back to Bitterblack Isle with Olra's help. We are much stronger this time around so I decide to take on that Cockatrice we ran past previously. Keeping with good D&D, the damn bird has a petrifying breath and Rose and Juliana are stoned midfight just as a huge black boss wolf shows up out of nowhere, because that's a thing here. Randomly spawning bosses.

I manage to cure Rose in time but Juliana is shattered by the big bad wolf before both beasts are laid low. Despite her loss we press on and recruit another ranger deeper in named Monterrey before taking on the giant beholder that stopped us before. Not so this time as we have enough ranged attacks and raw power (from Lily) to take it out. This opens a shortcut back to the surface (ala Dark Souls) and a path deeper into an underground fort with undead.

What made it challenging is our good buddy Death showed up again, meaning the team had to sprint through all the scum to avoid his one hit kill scythe, right into elder ogres and a tough minotaur type thing. Fortunately the spirit vanished at that point and let us handle these tough fights properly. There's also an undead dragon we have to run past later but it doesn't matter since it catches up to us at the next boss fight with its partner, the Lich Bishop - or Bich for short.

This is probably not going to end well...

This floating Bich proves to be way too tough as he summons tornadoes and other BS magics on top of being able to resurrect the dragon at will so once again we have to warp out of there, promising Olra will get that Bich next time.