Wednesday, 8 August 2012

Generation 13 Tips - The Slings and Arrows of outrageous Fortune

The epic storyline in Mabinogi goes in a totally WTF direction at this point as it begins to introduce Shakespeare; Literally. It is also nothing like the previous story-arcs and is quite easy despite being a pure solo event, more so if you've just come from whooping a deity in G12. Some really nice cutscenes here though but be prepared to read NPC conversations really quick if you want to follow what's going on (and for some reason haven't read "Hamlet" before).

Act I - Welcome to Avon
I am assuming you can handle Alby, Ciar, overly cute furry rats, and wolves by now. There's a named wolf you have to fight in one part but if you did the final battle class board mission you would have already defeated him. The only new things for you here you get to fight with some help:

Snow Trolls (with Laertes)
They only know smash, counter and defense and unless they are the giant version have no passive defenses simply making them big multi-aggroing goblins. Laertes is an ass-kicker so if you aren't quick he'll take all your XP. The giant snow troll may cause him troubles though (depending on your total level).

Elsinore Ghosts
Horatio will help you out here but he's useless so you're going to have to put these things back in the grave yourself. They also multi-aggro and have instinctive reaction (dont smash to open) as well as poisonous hands but no stander of any kind so just fight normally to eliminate them.

Acts II & III - Have an Antagonist
After bashing some goblins and being introduced to the Grim Reaper (don't fight him yet, just stay away from his attacks - if he jumps into the floor, MOVE) you need to stalk Claudius on the stage. Getting too close, being detected or being too far at any point fails the mission. Failing loses nothing so feel free to keep retrying - he always follows the same path too.


You will also face a Castle Wall Golem later on who has instinctive reaction and passive defenses against range and magic but is weak to melee so just like the ghosts, normal combo/windmill it to death. If you feel threatened you can always pet revolver, or trans or demi for overkill. After him you'll be sent into Rundal to fight a Siren. Nothing new here other than her unless you are doing this on hard so I'll run through them quick:

Siren
She's like a succubus that can summon Sahagins, use advanced magic, teleport and has high passive defenses in everything. Sounds pretty scary, but if you want you can lure her with a long bow away from her summons. Alternatively, just trans/demi and tear her to pieces. I seriously just pallied up and killed her in one smash. :/

Gnolls
You'll encounter these doggies if you are at "hard" level and they behave just like ratmen. A single windmill should be able to swat a whole bunch of them to death or deadly right away.

Sahagin Ranger/Fighter

Again only found it you are at "hard" level, you can treat these multi-aggroing fish idiots as goblins with windmill. Being over level 1000 though, they shouldn't be any cause for concern. Send them back to Dagon however you see fit.

Act IV - The Curse of the Black Pearl

Bet you didn't know he was in Hamlet.

So Hamlet and his two buddies are on a boat to England and are are attacked by a bunch of rats followed by a number of Barbosa's (skeleton) pirates. You will be playing the part of Hamlet it this strange mission and if your skeleton slaying technique is rusty, will probably be running it a few times. You lose nothing by failing though, and failing is easy when you have to protect your two idiot friends (both of whom Hamlet tricks into getting executed in the original story).

Afterwards you will be defending civilians against sentries for around 5 minutes which is pretty easy, just look out for their smash and counters. Windmill/assault slash like mad if you want to clear them quick and then you get a nice trip to the graveyard where you have to re-murder a number of weak Ghost Cloakers. If you beat Oroborous already, your smash should be able to 1 hit KO them.

Act V - Well that was Easy
Hamlet is going to challenge you to a duel (LOL) and if you lose you have it coming. Then you get to fight the main boss, the scary looking Grim Reaper who is perhaps the easiest end-boss in all the story arcs so far. He has three attacks - if he spins in a sommersault he is firing in a straight line where he is facing. If he is spinning like a top he is attacking a small arc in front of him (where he originally was facing), and if he jumps into the floor he is gonna pop out beside you and slice your face so keep moving until he reappears. If he manages to land a hit, all your stats will start to drain which is kind of a non-issue. To beat him just stand behind the idiot and use fast normal attacks (ie. not smash) and when he turns around to look at you just run through him to his back again. Alternatively you can just wipe the floor with him if you trans and demi. Your choice. ^_^

Tuesday, 7 August 2012

Generation 12 Tips (Part Two) - Fighting in Falias

Having taken care of those pesky alchemists once and for all in the previous section, it's not time to deal with the more powerful forces at work.

A Goddess Remembers being in Danger (solo as Morrighan then solo)
The first part is a very fun mission and a good introduction to Morrighan's god skills which you will be using later. Try to always keep Wings of Eclipse active and use your Wings of Rage from a far distance (they'll move into range if they notice you) on the Daols to avoid multi-aggro. Your first hit won't kill them though, so be ready with a Silent Move (you won't be getting this :P) hot-key to evade their attacks. Don't worry too much if you fail as you lose nothing to try again.

The second quest though can be quite challenging. You need to destroy a number of arches in Falias and they are guarded by Aonbharrs - winged wolves that have heavy stander, instinctive reaction and really high protection and HP. You may want to make use of the Brionac to deal with them and certainly trans when taking them on. Dragon support is also available to wipe out one group. Beware too of the floating stones as like Cerberus they cannot be targetted, but these ones fire Thunder and Fireball (adv magic) so steer clear!

Collecting in the Connous Underground (fastest solo)
Gathering stuff for the Ark of Falias is pretty straight forward - you would have encountered treasure chests in the Solea caves already if you had run to Vales (see second post), so it's just the Connous Underground that may be new to you. To get in, use an advanced L-rod (the digging version, humans need to ally with either the elves or giants to get one - though a normal one may work too) and find spots on the great desert outside Filia, preferably in sand storm regions. Eventually you'll dig up a cloud and a warning message. Wander into the cloud and you should fall in. Shouldn't need to fight any of the denizens in here (especially the Ifrit if he's awake) so just explore till you find some chests. To exit, just keep making your way to the center of the map and run up the stairs - or goddess wing out, or continent warp.

Golden Apple (best bring full party)
While there's nothing you haven't fought before here, most of the baddies are on their strongest variation and will spawn in big clusters so unless you like the idea of fighting 8 shadow ghosts alone you'd better bring a full team. The boss room especially has super powered boars and deers that must die in the offering circle to complete the mission. Don't be like me and windmill stuff out of the circle or it prolongs the difficult combat and annoys your helpers! :P

Final Chapter (solo)
It's end game time so prep well before entering this mission which comes in four parts:

Part I - Repair the stuff you Broke
Use Shock (without Brionac equipped) and touch the lithograph in the middle to figure out which one you need to fix. Fragments dropped from Aonbharrs will reassemble them. Again look out for the floating stones with advanced magic. Use everything you've got to stay alive.

Part II - The Feather is Mightier than the Sword
Not really, main boss will be throwing all sorts of crap at you and you need to run like mad to evade. When he begins his "light sword attack" you are supposed to use Morrighan's feather on him at close range. He only does this when he is airborne. If he lands, he is only doing it to smash you with his fist so steer clear.


After Part II, it's time to be like Neo.

Part III - Not Running This Time
Woo, now you've got perma demi for the rest of the mission as well as Morrighan's powers. Try to keep Wings of Eclipse active on top of your mana shield and avoid the main guy while you take down his minions. Like before, the Daols can be bad news but the area is big enough to lure one using a long bow. As long as you maintain single-aggro and avoid their light spears you should be able to take these guys down easily enough. Run away if Wings of Eclipse is turned off and keep evading till you have it reactivated.

Part IV - Attrition is Fun
Morrighan will help you face the main baddie and should she die it is game over. She's quite tough but don't draw out the battle for too long because she will lose eventually. As you may have noticed your adversary has a lot of deadly attacks when flying so the trick is to keep him grounded by hitting him with Wings of Rage the same time Morrighan does. When he's on the floor Brionac his face using any move (other than Windmill since he usually resumes flight if you do that) as much as you can. He can hit hard and do a shockwave attack while walking but your Wings of Eclipse and Mana Shield should be able to take the blows. Repeat until you are victorious.

Treasure Hunting
Now that you've won you can jump back to Falias at anytime by using the Brionac with either shock or demi-god to open a portal. You'll also require a falias fragment each time you do this which is only obtainable through Keith's Part Time Job in Tara Bank. I suggest doing it after a server reboot to give yourself better odds. Back in Falias you can change your god-powers back to Neamhain's if you so choose and you can try recover some of those artifacts you had brought. This involves defending an area against waves of Aonbharr but since I again haven't done it myself I'll have to write about it another time. :)

Monday, 6 August 2012

Generation 12 Tips (Part One) - Last of the Alchemists

Welcome to my quick tips for G12! This guide assumes you've read my previous classes and have certainly fought through the nightmare of the previous story arc. In comparison, this one isn't so bad but can still be tough in a few spots. Let's just quickly run through the combat bits:

Investigate the Homunculus Experiment (solo)
Nothing new for you here - you've been in tougher spots. It's a city mission too, which means you can call for dragon support or make use of the space for ranged attacks.

Don't worry, it's not these guys.

Alchemy Society (fastest solo)
Another outdoors mission with plenty of room to move. Other than the old shadow army guys you'll also find some arat boars (pig ai) and arat deers (shadow shire ai) that aggro pretty quick when you are close. The deer is more dangerous than the piggy but seriously if you are getting killed by Bambi then you should go back to combat practice with Ranald.

Secret Lair (solo)
A revisit to Peaca that is only scary if you are on Hard mode (over 1000 total level). The monsters spawn alone or in pairs and are pathetic shadows of their true selves. On Hard - they ARE their true selves so prep accordingly! :P

Jarlath the Hutt (solo)
Your main objective is to reach the top left castle room on the map. Bring an l-rod to detect the ice mines in your way though. Also there are 3-4 patrolling blinkers all of whom can be avoided by going through the central dining room.

Three Times into the Underground Waterway (solo w/ Leymore, then solo twice)
Again nothing too terrible here and no spiders to eviscerate your friend. Take down those baddies quick regardless though. On your return visit you want to prioritise the alchemists as they can keep summoning golems. God mode and/or Trans as needed. Your third run (Path of the Gods) through the same damned thing will be boring as there are even less monsters spawning, which kinda makes sense since you keep clearing the place out.

Goddess of Light (solo)
You'll meet new bastards here called Daols - like you they are demi-gods. They multi-aggro far and fast, have instinctive reaction (don't open with smash), can see hidden, have high HPs and can use spear of light at will. Even if you think you can take them you won't have the time to (15 mins) so as soon as it begins run to Navin (Neamhain) - you may need to use pets to distract or to move faster.

Coat of Arms (fastest solo)
City mission where you need to collect 6 pieces from 6 separate spawns. Shouldn't be problematic for you now since once again you have space and dragon support on top of everything else. Afterwards you get to run Temple Knights Rundal again, this time with Jenna (who is near immortal) which should make for a relaxing dungeon.

All Out Attack (solo)
The last stand of the alchemists, you'll have so many NPC allies here. If 5 unnamed or 1 named friendly dies you fail, fortunately the enemies are just alchemists (and optional spiders) so it shouldn't be that bad especially if none of them are targetting you! :P Just back-smash them all or final hit or god mode - don't use the dragon though as you'll undoubtedly hit and kill friendlies.

Spoiler! He's not the last of the alchemists either! :P

Sunday, 5 August 2012

Generation 11 Tips (Part 3) - Snakes. Why did it have to be Snakes?

Good news, if you're reading this you have already gotten past the "hard" part of the main arc and the end is nearly within reach. There is another extra mission though for those that love the babysitting castle run... extra annoying that is. :P

Showdown at the Castle (solo only)
You'll need to take care of some idiot python dudes first (beefed up but same AI is same AI), and I think you can call for dragon support to speed things up. You also have a big area to work with so archery skills are a bonus. Pick off those shamans first. Eventually the boss and his enterouge will spawn, deal with his minions first via range or lure the main guy away for one on one time. He should be easy enough to read to fend off until he uses his death shadow attack, which you strangely -want- to be hit by three times. you quickly use your shadow stone as soon as that happens though or you will really be dead. After that you will have perma-demi for the remainder of the mission and a new found (and very useful) power which you should use to slay the fool. Back it up with spears of light to speed things up but don't let him hit you with his shadow attack again.

Caliburn Pass (bring team)
With their leader dead, you should bring a team to chase down the remnants of the Python army. One NPC idiot will be with you and he needs to live against the huge number of baddies but this won't be so hard if you have a big group. This force is led by a python wizard (behaves like a shaman) has advanced heavy stander and cannot be knocked down/stunned so be careful when you final hit him as he can and will fight back. Use demi and trans as you see fit, and if you manage it you can also eliminate one wave using a dragon strike - just look out for friendly fire.


At least they're not on a Plane! (solo or with royal alchemist)
Now you have the finale - no not against those 4 shaman guys, against the 4 giant snake heads that appear after you kill them! I hope that by now you've got Rank 1 smash because that will come in really handy (and timely, you're on the clock) - in fact it is the only skill you need here. That's right, you just need to be the Hulk. Bring enough stam pots to let you keep using it along with the rest of your regular finale gear and try prioritize "downed" heads to deal real damage to them. The key to surviving is not getting hit! DUH. :P Fortunately the snakes follow a set pattern which should keep you ahead of their quite lethal breath attacks which come in two main variations:

Fireball - they launch projectiles exactly where you are standing. How to ever evade this? Oh yeah, just MOVE. Easy. May as well load up a smash while doing so, and if you feel like - sneak a smash in before the next attack begins.

Rivers of Fire - this is the one you really want to avoid as it is almost insta death to get hit. There are always safe spots to stand when they do this, it is just knowing where to be. They fire three of these in sequence (and I'm not kidding, it always follows the same sequence - after sequence III it goes back to the first one) so you can predict what's next. Generally it's not wise to attack them while they do this as you need to be thinking of the next safe spot to stand in.

General Behaviour:
Fireball (x2) . Resting (smash em) . Flame Throwing Pattern (see below) . Resting (smash em) . Fireball (x2)

Attack Sequence I: Circle, Cross, Circle
On Circle: Stand in the middle of the circle to evade.
On Cross: They are breathing at the head across them, so stand to edges of the screen not occupied by giant snake heads.

Attack Sequence II: Up or Down, Cross, Up or Down (opposite of 1st)
On Up or Down:  Stand on the left or right edges (remember the screen is at a slight angle) not occupied by giant snake heads.
On Cross: They are breathing at the head across them, so stand to edges of the screen not occupied by giant snake heads.
Recover: This is the only sequence where if you are standing on the left or right edges at the start, that you can get a breather to demi/trans or bandage as you don't need to move for the duration.

Attack Sequence III: Left or Right, Circle, Right or Left (opposite of 1st)
On Left or Right: Stand on the top or bottom edges (remember the screen is at a slight angle) not occupied by giant snake heads.
On Circle: Stand in the middle of the circle to evade.

Going for a Party Dress
After those giant snakes you may underestimate the little castle rats in this mission. They will be levelled to match you, so expect them to survive your first combo. Other than that, they're just rats. :P

Suspicious Rumor (solo or with royal alchemist)
Oh good, now you get to meet the 2nd most horrible "normal" spawn in the shadow castle (blinkers still worse)... sulphur spiders. These multi-aggro bastards are tough, do high damage, can take a beating, and enjoy spamming their deadly windmill. The non-colored ones are weaker, but tend to explode upon death. Be ready to heal/trans/and demi as needed, and use a shield if you are planning to use turtle defense. AoE summoned pets are also useful especially if they pin you to a wall.

Getting some Support (solo)
Just a really long castle mission here with nothing you haven't beaten before (no spiders, yay!). Bring gear to recover and look out for those wandering blinkers (damnit!).

Another Secret Experiment - Weapon X (solo with one NPC)
Oh man, you are really going to hate your stupid, suicidal friend here as he will probably die a bit to the many sulphur spiders in this mission. Just kill them as fast as you can and heal the fool when you are able. Say out loud the phrase in the secret note you found in the final chamber to access the second part. If you make it here then at least your pal will be fully healed and he actually does better against the enemies here (no spiders) but you should still help him out. Have the Brionac ready in your secondary slot once you reach the boss room because Deadpool (he's back!) can aggro you from very far away. Fastest way to beat him is to demi-god and spear of light him twice (with Brionac in your hands to increase damage). A drawn out battle is not good for the health of your allied NPC.

Friday, 3 August 2012

Generation 11 Tips (Part 2) - Beginning to Hate that Castle

The previous section sets the tone of what is to come (in a word: frustration), but nothing worth doing is ever easy so just grit your teeth and plow through these at your own pace - remember you can take breaks from this nightmarishly difficult story-arc by doing other things like normal dungeons, life skills, trading, tending to your homestead or just chatting with friends in town. :P

Song of Partholon (solo)
Woo a return to Ciar! Aren't those goddess statues grand? While it will scale to your level there is nothing you haven't fought variants of here before. Expect everything to multi-aggro, and windmill will serve you well. Don't forget, you have TWO transformation types to help you out by now if you really get into trouble.

The Three Stooges (solo with 2 NPCs, can bring royal alchemist on second run)

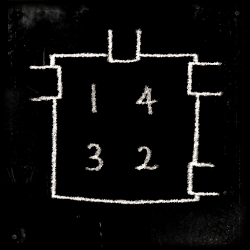
Remember how you kept those 2 twits alive a few missions back? Well you'll need to do that again, fighting pretty much the same baddies, through two MUCH longer castle missions so be sure to prep lots of gear. Fortunately they are both not timed, meaning you should bring bandages and heal them when you get the chance. Second time through offers a mini orb puzzle in the central castle room. Hit the orbs without dual wielding in the following order to avoid fighting extra bastards, or if you really want the EXP - just whack away. :P

Hit them in that order to sail through.

Seven Pages (solo, or with Royal alchy)
What is it with people leaving pages in the shadow castle? Well this time you can only find the pages inside a leprechaun's pants so you need to fight tooth and nail to get into them. Yah, Mabi is funny like that sometimes. :P You can only get 3 pages from the little man's pants (if you don't kill him) and one from the end chest which means you need to do this mission twice at the minimum. Due to repeated pages expect more like 3 times. Only "new" enemy are ghosts of partholon which are the weakest "ghosts" in the game. The behave exactly like the temple knights you caned in the previous story arc so they shouldn't be a problem.

Glimpse of Peaca (better bring a team)
Peaca is a really bad place, and even though it is "toned down" to have only one or two monsters per room you will need to be on your game to survive, especially if this is your first time coming in here. Fortunately there's a statue to revive and again, no time limit to complete so recovery in possible. The usual denizens in here are:

Ghouls
Ranged attacks are innefective and they have minor heavy stander. You can smash mill the bastards but they can windmill you back too so look out. "Ice Tennis" is recommended, that is one person fires an ice or lightning bolt to stun the enemy, while a second smashes it's face. Roles are then reversed and it continues until the enemy is dead.

Wights (Whites lol - they sound like laundry)
Immune to melee. Use ranged or magic to take them down. Like ghouls they can also windmill but these baddies also come with advanced magic and chain casting to back it up. If you are a melee only person, defend your archer by standing in front of them ready to windmill the threat away to buy them time for another shot.

Cloaker
Immune to magic and loves to cast death-dealing thunder. You can archer the thing to death or team smash as it has no windmill or counter, only defense.

Ghost
Immune to magic and highly resistant to anything else, they can also cast advanced magic (based on their color), teleport and windmill with high damage output. They will most likely kill you a few times, so don't be shy to trans/demi against them. Pin them to a corner and group-mill them to death or arrow revolver archer with windmill defeners like a wight. If you manage to pin it down with Pummel then your friends can get in free smashes.

Hollow knight
Stronger versions of the ghost armors you've fought in G1. High defense against melee, and team smashers should be careful of its windmill. Weak to magic, but it will take long to defeat with so many HPs. Magnum will work, but usually this begins an archery duel as the Hollow Knights also know magnum and worse, arrow revolver.

Lucas the Rapist
The boss of this version of Peaca, he behaves like a bear. If you've fought past everything else he should be easy enough to defeat. Unfortunately you can't kill the prick. In case you were glossing over the story, not talking to NPCs, or just unable to read between the lines, he basically raped Belita and attempted to drug-rape Dilys too. Scum like him deserve a painful death but in Mabi, a minor beating is all you can dish out.

Ancient Alchemy (solo)
Given that you've fought worse by now, the low number of spawns here shouldn't cause you any problems.

Everyone is in Danger, not just Jenna (solo with one NPC)
No combat required in this mission, just to be quick. Go in prepped with a cylinder and a shock crystal. You'll need to use shock on yourself then sprint to the Brionac (spear thing) and touch it to end the mission, before Navin kills you or your buddy. Steer clear of her when she's doing fury of light too.

Thursday, 2 August 2012

Generation 11 Tips (Part 1) - We eat Demigods for Breakfast

You would think now you are a "demi-god" that things would be easier for you, but this story arc just ramps up the difficulty so much that it's almost like you need your new powers just to survive. There's a long list of trouble spots for this one so let's get right into it.

The not-so Hidden Page (fastest with some friends)
You'll be given a monacle to find a hidden page somewhere in the shadow castle. Fortunately these pages were written on sparkly paper and they emit a very visible shine when you are nearby, indicating when you should put on your eyepiece to pick it up. There are a few missions where these pages appear but for ease and speed I recommend running "The Other Alchemists" on basic and bring some friends to speed it up. You will meet a few new baddies here:

Blinker
The bane of castle missions, these multi aggro floating eye balls have a dendancy to hover around and using a spot-light, drain peoples HP. Prioritize them and open with a smash to hopefully take them out before they notice you. Supposedly sand-burst and frozen blast is good against them too but I'm no alchemist. For a change, windmill is not so good as if they survive it they usually do their hover attack. Also they can summon extra help if wounded too badly. If they cause you too much strife, use your new-found powers to wipe them out fast.

Python Soldier/Shaman
The extra help I was just talking about, though their AI is familiar enough. The soldiers are basically re-skinned shadow fighters while the shamans behave just like the hobgoblin shamans you would have already fought in G7 while looking for those artifacts. You didn't skip it like an idiot right?

Leprechaun (small and giant)
These jolly little fellows are very timid, weak, easy to read, and if you knock them down (without killing them) you can "harvest" their pants of loot. Yes, it is as wrong as it sounds. They've got pretty strong magic though so don't foo around too much. The "giant" version is a guardian of a mini treasure room where you need to shrink and go through a mousehole to reach. No point fighting him, just get a pet to distract him while you loot and escape!

Cerberus
Though you may not run into this in this particular mission I thought I'd add it now. It is an indestructable trap that appears in the middle of a room and will fire bolt magic or poison fumes every so often. You can duck into the corners to avoid the poison (it's eyes will glow purple as a warning) and use evasion for the bolts but the only real way past it is to clear the monster spawn quick. Poison spitters will never use bolt attacks and vice versa.

White Orb and Warp Rooms
Again you won't run into these right now, but you will eventually. In the "white orb" rooms one orb will glow white for a few seconds then move to another orb while you are fighting baddies - if you hit the white orb the door will open allowing you to cut short the combat. The opposite of this are the warp rooms, where you hit an orb (during combat) which opens a warp portal providing the only way out or face an unending spawn of monsters.

Basilisk
This large and heavy lizard has very high passive defense and will not be knocked down by anything, so just use the highest damage attacks you have available while you've got mana shield and pots keeping you alive. There are "gaming" ways to beat it in a less dangerous fashion but if you brought help and are running this on basic as I suggested, you should be fine especially with trans.

Royal Library (solo or with royal alchemist)
A short mission but the main problem is you will be facing a Blinker on "your level". Be prepared to use trans and demi-god powers to take it down. If it causes problems you can ask a Royal Alchemist for help.

Into the Frying Pan (solo with Gwelyas)
Now you will start getting killed by food. I kid you not. The main objective here is to "kill" 5 ~ 9 Fruit, 5 ~ 13 Flour, and 7 Eggs within the red circle and to hit the big spoon to exit after 7 minutes (important). These things have incredibly high protection so it helps to go after the things your NPC buddy has "tenderized". When the silverware starts spawning (behaves like flying swords) you can kill them to get a cooking knife for yourself which can help lower the defenses of the food. Expect to have to demi-god and pally or be prepared to be defeated by eggs and berries. I don't need to say that killing anything that shouldn't be in the dish within the red circle will stuff you up royally. :P

You probably need to trans/demi to beat these!

Strange Books (fastest solo)
An easy mission with a new enemy type. Strange books can launch explosive paper airplanes in random directions. They shouldn't cause too much problems to defeat however as they are just an upgrade of the mimic types. Windmill to open.

Getting the gang back together
Need to find some NPCs you've met before, and the first one is within the shadow castle again. You'll be fighting familiar spawn, just lots of them and by yourself (unless you have a royal alchemist buddy). Just trans and demi as needed, there's no time limit so you shouldn't be in a rush. Incase you've forgotten your priority should be wizard/archer -> lancer -> fighter. The next dude is in the shadow city, don't you miss this place? There are a few baddies that you can avoid, but for more fun I recommend dragon striking since you won't be able to use it for majority of this story arc.

Revenge (solo as Jenna)
To make it go a lot faster than the TV series of the same name, just stand far away from the multi-aggroing enemy alchemists and magnum shot all of them to death. Should be a piece of cake.

Caliburn Investigation (fastest solo with 2 NPCs)
The first of unfortunately many missions where you need to keep your stupid suicidal buddies alive. Expect to do most of the fighting and try kill things quick. It's the same baddies you've fought before but you may need to be more reckless this time since you're baby-sitting morons.

Wednesday, 1 August 2012

Generation 10 Tips - A Demigod is Born

Welcome to my quick guide for Generation 10! I am assuming you have read through the previous classes at this point which means you already have a good grasp of the majority of the enemies here. You've already survived G9 so you won't find G10 so bad. After the last quest line, the shadow forces are in withdrawal (I assume), but those pesky alchemists are still up to no good. Here are the spots I think may give you grief.

Survivor Rescue (solo)
Welcome to Shadow Tara! Ironically the first things you see will be some of the strongest bastards in this story arc. Those shadow ghosts are highly dangerous and for now it would be wiser to flank and avoid them to reach your destination. You will however need to fight some bone soldiers who are pretty much exactly like their shadow counterparts, so nothing new here.

Lezarro's Book (solo or with royal alch)
Standard fare of killing stuff in orb sections, just stick to the main roads. If you are having problems finding the orbs bring along some arat berries to radar them out until you get used to where they spawn. The boss room features zombie soldiers, who basically are just like the Tir Na Nog zombies. I hope you've been practicing your windmill - if not this could be a difficult fight and you may want to look for a royal alch to help you out. Or better yet, just practice windmill?

Lileas' Honey (solo)
Just want to point out your main target here are the honeycomb trees, not the bad dudes. You don't have to kill any of them.

Jousting Practice
The last bit of a large collection quest has you joust against an NPC in the arena. This is a pretty fun mini-game and it is worth paying the small amount of gold to get used to it even after you've completed this quest. You'll need at least a mid-level proficiency in it (reading NPCs) later on.


It's come a long way huh? :P

Cubic collection (fastest solo)
Getting you exploration up should be easy by now if you've been doing the Cor circuit. When it's time to get the cubic stuff just load up on passes before heading out. Fastest collection is by only doing the first 2-3 rooms, wiping out mimics, then leave and repeat until your collection book is complete.

Third Wheel in Maiz (as Arenren solo then as Voight and Isla - you need a friend)
If you haven't yet gone to get your Final Hit quest (humans) then there's a high chance you've not been in the Maiz Praire ruins before, and you are in for some tough opposition. When doing the 2 player version, Voight will be doing most of the fighting but Isla -MUST- still cover him. Use magic to buy him time to windmill or counter the multi-aggro mobs.

Slates
They behave like goblins but have very high protection (no passive defense though) and even higher damage. Using defense will probably still result in serious injury so windmill, counter, and smash if the opportunity presents itself.

Skeleton Ghost
Generally all ghosts in Mabi are bad news, at least this type has no passive defense. They do dual aggro quick and do very good damage in both melee and magic. Final hit may result in your death if two of them are on you, so you are better off luring one to a free corner and dealing with it the usual windmill, counter way. Be ready to take action if it charges up magic though as it will almost always move in for a melee swipe right after. They can also windmill.

Return to Longa (fastest with party)
Just variations of the critters you fought on your last run through here, the only thing new is the boss at the end - a familiar named alchemist. He tends to just behave like any other alchemist though, with the extra ability of healing to full if he yells "I am immortal!". Makes you wonder why he doesn't just keep doing it. Anyway, if you are solo just turn on trans and wipe the floor with him - get ready for the usual wind/water blast combo. If you have a group, just keep him on the floor so he can't do anything with smash-mill.

Fomor Mata (solo)
The fights to the arena should be nothing new for you, but when you get there your jousting skills will be put to the test against a fomor commander. Fail the joust and you fail the mission. Hope you've been practicing! Win the joust and then you have to beat him on foot. He is pretty much the same as the named commander in the previous story arc only in black armor instead of gold. Look out for his golems and his life drain and remember you can use the entire city to maneuver around if need be. Don't open with a smash as he has instinctive reaction. Poison may be useful against him if you or better yet, a pet has it.

Couracle's Heart Again, because you forgot to pick it up last time (bring full party)
Basically you'll be fighting a zillion baddies you've already fought before - just all at once. To this end bringing a full party is recommended. In the final area you'll be joined by NPCs from Tailltean who once again must survive the encounter. Don't worry, it's not as bad as the "Last Battle" in the previous story arc. Those shadow ghosts you avoided in the first mission will be here again, and this time you'll need to fight them. They have thunder (perhaps your first baddie with adv. magic) which can easily kill anyone and heavy stander so make sure they don't get to cast by standard gang smash-mill. One skilled person can disable the ghost long enough for his buddies to kill the rest then help out. Alternatively 2 should be able to take out a ghost directly by keeping it on its ass.

The only thing in your way is yourself (solo or with royal alch)
Before entering the shadow realm prep a cylinder in one weapon slot and your primary weapon in the other. Also prepare a hotkey for "life drain" even if it is at novice rank and move all your current life drain crystals to the top left of your inventory if you have any. The finale takes place in a very familiar place and has two stages. Your enemy will be using alchemy skills that you can use evasion to dodge plus demi god abilities which are evadable by just running around. Any damage you do to it will hurt you by 50% - but this is not a bad thing. Punch its face once (cylinder equipped) to injure yourself then evade like crazy. After it does the "area" attack (as opposed to the light spear attack) it will taunt you so use the music box to make it go crazy temporarily. As soon as this happens hit your life drain hot key and drain the bastard (if you brought a royal alch this is his job). To proceed to the next stage the life drain must restore you to full health, so you cannot be too injured (unless your life drain skill is unusually high) and not be on full health to start with. If you run out of dark life drain crystals or he kills you, you may as well restart the mission and save any nao stones you were planning on using for stage two.

Second stage has him summon some buddies but now you have the demigod power. Don't be hasty as it doesn't make you invulnerable! Your regen will be much higher now and you should be able to outrun all your enemies, but having HP and Mana pots in reserve is a good idea (you should know to be using mana shield by now). If you followed each story arc then the best thing to do now is stand in a clear side of the circle and call for a dragon strike on those bastards then work on slaying the main guy. He will resummon all his pals if you kill all of them, so if possible leave one or two far away so you can deal with the main baddie in peace. You can then go berserk using your new abilites on your foe to destroy it quicker. Ho ho ho, now you have demi-god mode. :)